KnowledgeBase
Search or browse in depth articles, software resources and videos on everything about Appward.
FAQ
Actions
Incoming
Incoming actions are actions that are directly assigned to you.
Outgoing
Outgoing actions are actions that you have assigned to other members of your organization.
Yes, a notification will be sent directly to your workspace when the status of an action progresses. You can read more about how notifications work here.
Action stages are the phases or specific statuses that an action goes through during its lifecycle. Action stages update automatically when specific tasks within an action are completed. You can also manually change stages if necessary by selecting the appropriate stage during the course of an action.
What are the specific stages an action can be in?
Draft: The action is still being planned and conceptualized.
Sent: The action has been sent out the relevant recipients.
Viewed: The assigned individuals have accessed and viewed the details of the action.
Active: The action is currently in progress.
Complete: The action has been reviewed by the necessary individuals in your organization and has been marked as completed.
Close: The action has been closed, meaning there is no further action required.
Announcement Director
The Announcement Director app in Appward is designed to deliver important messages directly to employees' desktops, ensuring they receive important information promptly. This app helps facilitate updates quickly by bypassing busy email inboxes or external messaging software, where information can be overlooked or lost.
Yes, you can customize the content of your announcement using the built in HTML editor. Here, you can format text, insert images, embed videos and tailor the announcement to your specific needs.
Yes, you can reuse the same announcement as many times as you need to. Each dispatch of an announcement will be listed in the bottom portion of the Dispatches tab.
Yes, you can assign Appward as the sender by selecting the Sent by Appward checkbox in the Dispatches tab. This is useful for sending general announcements from the server.
Auto dispatching is a feature that allows announcements to be sent automatically based on predefined settings. To set up auto dispatching, follows these steps:
1. Navigate to the Dispatches tab
2. Enable auto dispatch by checking the checkbox
3. Select the sender and recipient(s)
4. Set dispatch date and time
5. Dispatch your announcement
For a more in-depth guide on how Announcements are created and dispatched, please check out our Getting Started with Announcement Director guide.
Yes, you can include images, videos, and GIFs in your announcement.
Yes, you can view this information within the Dispatches tab. This section provides details such as the recipient list, the number of recipient views, recurrence information, and more.
To dispatch an announcement, navigate to the Dispatching tab within the announcement details. Here, choose recipients(everyone, specific members, or departments, set a lifespan for the announcement, and then press dispatch.
Announcement statuses indicate the current state or condition of an announcement within Announcement Director. These statuses include:
Draft : The announcement is still being edited or is not yet ready for dispatch.
Active: An announcement that has been successfully dispatched and is currently visible and accessible to recipients.
Complete: The dispatching process for the announcement is complete and no further action is required.
Announcements
The Announcements app is designed to serve as your central hub for viewing and posting about the details of your organization's announcements.
To like an announcement, you can click the "Thumbs up" icon in the announcement popup window. This action will notify the sender that you have liked their announcement.
To hide an announcement, press the Hide button located in the top right corner of the app screen while viewing the details of the announcement. This will remove it from your visible list without deleting it.
No. The Announcements app is used solely for viewing announcements you have received. To create or edit announcements, you need to use the Announcement Director app.
Yes, you can view an announcement at any time even if you missed it at the time it was sent out.
Announcements, alongside Announcement Director, provide your organization with the ability to send and manage messages directly to employees' desktops, ensuring they receive and acknowledge important information. Announcement Director is where you can create and manage the details of an Announcement, whereas the Announcements app is where you can only view your announcements.
API Functions
In the world of computers and software, an API (Application Programming Interface) is a bridge that enables different programs to communicate and share information, making it possible for them to work together and perform more advanced tasks than they could on their own.
What is API Functions for?
API Functions is an app where you can build out your own API in Appward. With that API, you connect your external software programs with our suite of business management applications. It's like a digital translator that helps your software "talk" to ours.
How does it work?
By using API Functions, you can create a direct line of communication between your external software and Appward, either through a library of pre-built or your own custom-built actions. This allows you to share data and trigger actions in Appward from your own software.
Why is it important?
Imagine you have different software tools for your business, but they don't always work together. API Functions solve this problem by letting you seamlessly integrate Appward's features into your existing workflow.
What are the benefits?
-
Efficiency: Save time by automating tasks and syncing data between your software systems.
-
Customization: Tailor your connections to match your specific business needs.
-
Flexibility: Access Appward's functionality from within your own software environment, making it easier to manage your business operations.
In short, API Functions make it simple to extend the capabilities of your external software by connecting it to Appward.
For each API function, there is a setting in the function details called Usage tracking.
![]()
This feature can be enabled to track any time that the function is called in any of your apps. If you enable usage tracking by clicking the box, you can see all of the instances of that function being ran in the Usage tab.
![]()
Within this tab, you can see when the function was ran as well as all of the information that got passed via the function's parameters.
![]()
To sum up, usage tracking is an incredibly powerful feature that provides you traceability of every time someone runs one of you API Functions, regardless of where it is ran from.
App Creator
What is App Creator used for?
App Creator in Appward is a tool that lets you make your own apps, even if you've never done it before.
How does it work?
Think of it like building with blocks. You pick the pieces you need, and with Appward's low code environment, you can put them together to make your app.
Key Features:
-
Start from Scratch: You can start from nothing and create your app step by step.
-
Ready-Made Templates: If you're not sure where to begin, we have pre-designed templates you can use as a starting point.
-
Easy to Use: You don't need to know how to code. The interface is easy to understand, and you just drag and drop things where you want them.
-
Make it Your Own: You can customize your app with colors, fonts and layouts to match your style.
-
Connect with Other Apps: You can connect your app with other apps in Appward, like databases or special functions, to make it even more useful.
Why is it important?
App Creator is important because it gives you the power to make tools that work exactly the way you need them to. It's like having your own personal assistant for your business, without needing any fancy tech skills. Plus, it saves you time and money compared to hiring a developer to do it for you.
In short, App Creator is all about putting the tools of app-making in your hands, so you can build exactly what you need, quickly and easily.
During the app creation process, you'll come across the following Settings screen.
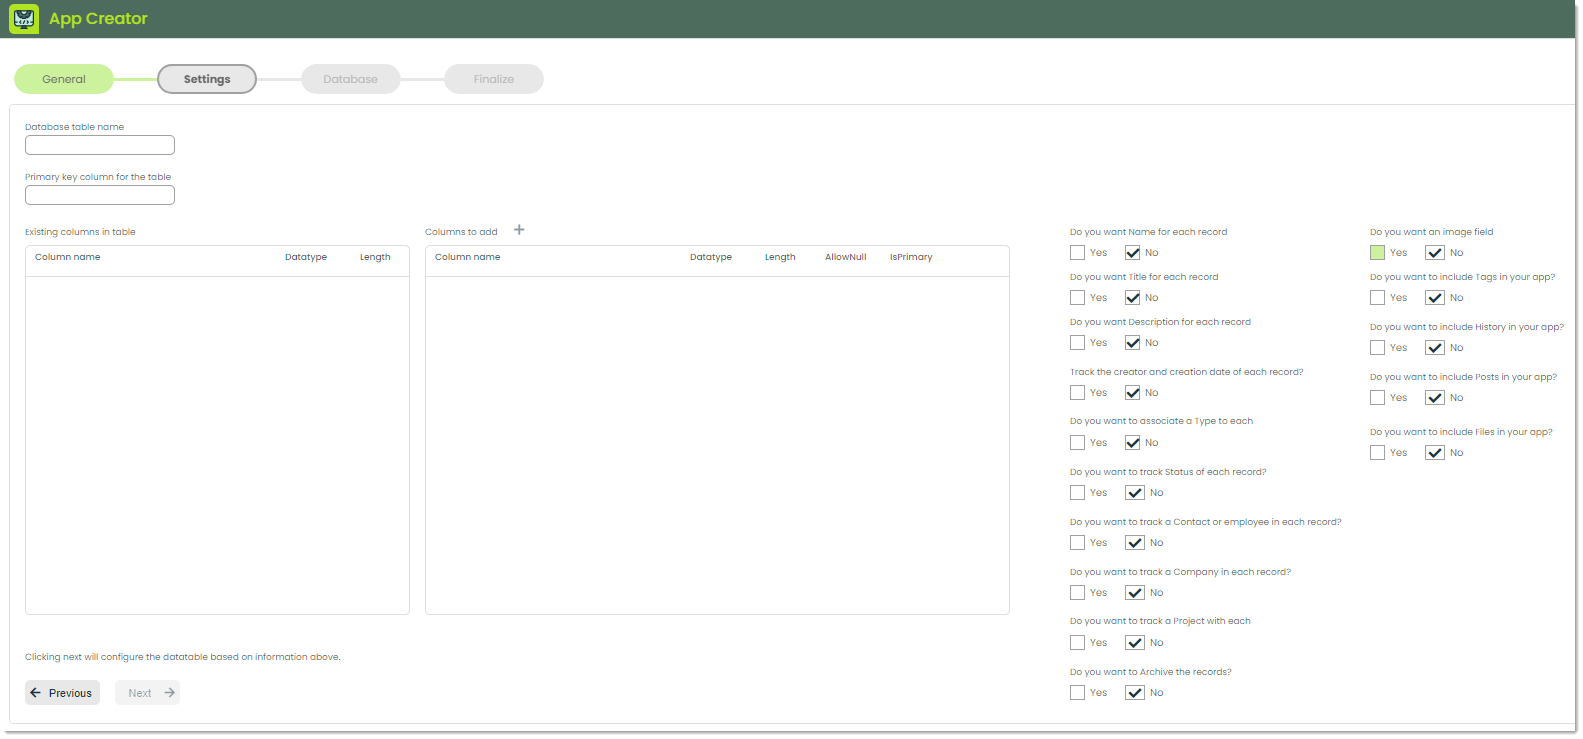
When creating an application, you often need a way to store and retrieve data specific to that app. That's where database tables come in handy. Think of a database table as a digital storage compartment where your app can keep all its important information neatly organized. Your Appward software comes with a built-in database for you to not only use the provided database tables, but also create new ones (for cases like creating a new app). For reference, you can find your database and all of its datatables by going to the Database Manager app.
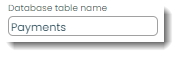
To make sure your app knows where to find its data in the database, you'll need to give it a name. That's where the Database table name comes in. It's good practice to name your table the plural of whatever data you are tracking. In the following example we are tracking invoice payments, so the table will be called "Payments".
Note: If the table already exists in your organization's database, you'll see a message that tells you it exists, and all available information on the table will populate the Settings page.
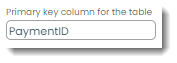
Every piece of data in your table needs a unique identifier so your app can easily find, update or delete it. This unique identifier is called the primary key. It's like a special tag attached to each item in your storage box, making it easy to pick out exactly what you need, even in a large collection of data. It is good practice to name to primary key of your table is the singular of the table name like in the following example.
Now, let's cover the middle section for database columns.

Database columns are the individual fields or attributes within a database table where specific types of data are stored. Each column represents a particular piece of information about the entities or records stored in the table. For instance, in a table storing information about customers, you might have columns for their names, email addresses, phone numbers and so on.
The Existing columns in table field will check your database for the table name you've entered and return the columns for that particular table. If none exist, you can add whatever columns you want in the Columns to add section.
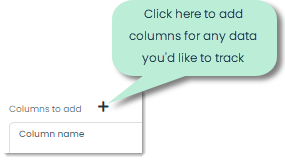
Here's an example of adding a database column called "Description" to store the description of an invoice payment.
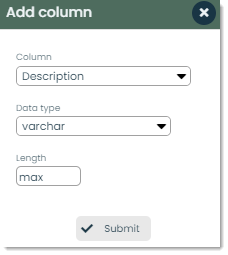
Note: The data types and lengths follow SQL standards. For more on how to use these, we recommend you refer to some introductory SQL documentation such as https://www.sqlcourse.com/.
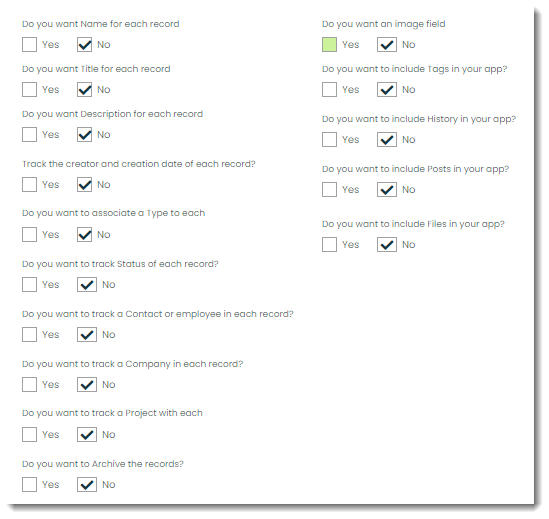
Finally, there is a series of questions to answer where you can set up some presets. This includes various columns you can automatically add and whether or not you'd like to utilize Appward's built-in features in your app such as Posts and History.
Articles
Appward's Articles app is designed to centralize your company's knowledge base and provide a robust platform for creating, organizing, and sharing engaging content.
Organization Articles
Organization articles are created and shared exclusively within your company. These articles offer a valuable way to preserve and share knowledge, ensuring everyone in your organization has access to important information when they need it.
Appward Articles
Appward articles, provided by the Appward team, include templates, guides, best practices, FAQs, and other resources. These articles are accessible to all organizations using Appward but can only be edited, added, or removed by a member of the Appward team.
You can create various types of articles, including guides, FAQs, best practices, templates, and knowledge base articles, tailored to meet your organization's needs.
Yes, you can collaborate on an article with team members across your organization by ticking the Global Edit checkbox in your article's settings.
Yes, you can improve your article by adding images and videos, making your content more engaging and informative.
Yes, you can create private articles that will only be visible to you. You can do so by ticking the Private checkbox during the creation process of your article.
Yes, when creating an article define which app you would like to associate it with in the Application field.
You can track changes made to an article by accessing the History tab. This feature allows you to view detailed records of who made each change, what the changes were, and when they occurred.
Assets
Appward's Assets app centralizes your organization's assets, facilitating timely maintenance, highlighting necessary upgrades, and improving overall asset condition.
The current condition or state of the asset. It reflects whether the asset is currently in use, available for use, undergoing maintenance, or in any other state defined by your organization.
In Appward, assets are distinct instances of a part. For example, while multiple identical computers may fall under a single part, each computer is treated as an individual asset.
Yes, if the asset is already in your organization's Parts app, you can select the part from an imported list to auto-populate the provided fields.
Associated task templates are used to create maintenance tasks for an asset that share similarities, simplifying the process of creating tasks with common characteristics.
The Auto Set feature helps you set up an automated way to number and organize your parts, including configuring numbering conventions and reset intervals. For more info please check out our auto-numbering guide.
Asset locations refer to physical places where assets are placed within your organization's facilities. They are defined within the Location field of an asset and can be selected from a list directly imported from the Locations app.
Purchase orders help track the acquisition of new assets, detailing the costs, quantities, and vendor information associated with acquiring the asset. You can read more about the Purchase Order app here.
Parts found in Assets originate from your organization's Parts app, where they are initially created and managed. If your organization has no parts yet, you can also start creating them in the front line of an asset.
Boards
What is a Board?
A Board, in the context of project management, is a visual representation of tasks and their statuses. Think of it as a digital whiteboard where you can organize tasks into columns or lists, with each task represented by a card. Boards help teams visualize their workflow, track progress and collaborate effectively on projects. In the Boards app, you can create multiple boards for different projects or teams, making it easy to manage tasks and stay organized.
What is the Boards app for?
The Boards app in Appward serves as a dynamic project management tool, drawing inspiration from Kanban boards to help organize and track tasks effectively within your organization.
How does it work?
With the Boards app, you can easily browse through all of your organization's boards, cards and favorite boards. Within each board, you can track tasks using individual cards, which can include a description, assigned team members and collaborative features for logging progress and updates.
Key Features:
-
Task Tracking: Organize tasks into cards within boards, allowing for easy visualization and management of project progress.
-
Collaboration: Collaborate with team members by assigning tasks, updating progress and logging every step of the journey directly within the app.
-
Progress Updates: Intuitively update the progress of cards using lists, such as from pending to in progress to review to complete, providing clear visibility into task status.
-
Communication: Notify relevant team members or assigners of card updates via posts, facilitating communication and collaboration throughout the project lifecycle.
A Board contains a list of tasks, organized into columns that usually represent their status in terms, such as: Pending, In Progress and Complete. This visual approach to project management is commonly referred to as a Kanban. Boards help organizations visualize the work required for a project, collaborate together to get it done and track progress during the process.
Cards represent individual tasks within a board. They progress through various lists, reflecting the different stages of a task.
The Schedule tab presents a Gantt chart illustrating board activities, detailing their start dates, duration, and end dates.
To create a new board, start by click the + button at the top of the app. Once you've named your board and provided a brief description, you'll have the option to add board lists. These are the columns of your board to help you organize your tasks. You can think of them as different stages or steps in your workflow. For example, if you're managing a project, your board lists might include "To Do," "In Progress" and "Done." Adding these lists allows you to visualize and track the progress of your tasks as they move through each stage.
The Boards app is not exclusive to certain roles or departments; it's for everyone, from the top brass to the newest recruit. Whether you're a team leader coordinating projects, a marketer managing campaigns or an individual organizing personal tasks, Boards empowers your entire organization to stay organized, manage its initiatives and orchestrate productivity at every level.
Yes, you can customize the colors of boards and lists to visually differentiate between them. This can be done during the add process , or when viewing the details of an existing board or list.
Favoriting a board makes it easily accessible by adding it to the Favorites tab. This allows you to quickly find and access boards that are important or frequently used, without having to search through all your boards. To favorite a board, look for the button with the star icon on it, in the top right corner of a board.
You can make a board private by adding exclusive members, who will be the only ones with access to the board.
To track time spent on a card you can use the built in Timelog feature. Navigate to the Timelog tab within the details of a card. Here, you'll be able to start, stop, and pause your timer as you go through your task.
Budgets
The Budgets app provides your organization with a robust suite of features designed to improve every aspect of financial management. From creating and monitoring budgets to analyzing spending patterns, Budgets has you covered.
A baseline budget is the estimate of project costs that you start with at the beginning of your project.
Draft: The budget is still being created and has not been finalized.
Pending Approval: The budget has been submitted and is awaiting approvals from the relevant party.
Approved: The budget has been reviewed and approved for implementation.
Not Approved: The budget has been reviewed but was not approved and may required revisions.
Completed: The budget has been fully executed and no further changes will be made.
Yes, you can view the recent edits made to a Budget by viewing the History tab.
Budgets is integrated into many of the apps within Appward. In apps like Suggestions or Changes, you'll find a Budgets tab that allows you to create, view, and manage budgets seamlessly.
First, create a part in the Parts app. Once you've populated the Parts app, these parts will be available for selection when adding or editing a budget.
Yes, you can add labor costs while adding or editing a budget. Provide necessary details such as type of labor, hourly rate, and estimated hours required.
Calendars
Appward's Calendars app is designed to help you and your organization manage busy schedules and improve overall time management. It provides a unified interface where you can add events and switch between monthly, weekly, and daily views.
List view displays all the information from the Calendar tab in an easy-to-read list format. It includes essential fields like Title, Calendar Name, Start Time, End Time, Duration, and Location, helping you stay up-to-date with your organization’s events and schedules.
Yes, you can create a private event by marking it as Private when adding or editing the event. Creating a private event restricts its visibility and accessibility, making it only visible to you or other selected members.
When creating or editing an event, you can set it to recur by specifying it's recurrence pattern in the event details.
Yes, you can customize your view by toggling specific calendars shared with you within your organization. This gives you the flexibility to manage your schedule and view the specific events that are relevant to you.
Yes, the Calendars app integrates seamlessly with many other apps in Appward. For instance, it synchronizes with the Trips and Meetings apps, allowing you to view specific meetings and upcoming trips directly on your calendar. For a more in-depth explanation of how it integrates throughout all of Appward, please check out our Getting Started with Calendars guide.
You can choose to view the calendar in either a calendar view or a list view. In the calendar view, you have the flexibility to sort events by day, week, or month, allowing you to customize your view based on your scheduling needs.
You can filter calendar events by EventID, Start hour, End hour, Event creator, Calendar creator, and Location.
You can use the Calendar history tab to view a record of all modifications made to events. This feature provides a complete audit trail, ensuring you can keep track of any changes made to a calendar.
Certifications
The Certifications app helps your organization maintain up-to-date certifications for components and materials, ensuring compliance with industry standards and regulations.
Use the search bar at the top of the app to find certifications by name, type, or other relevant criteria.
You can assign any qualified individual within your organization as an inspector for a certification. This person will be responsible for verifying compliance with established standards, regulations, or requirements. You can select the inspector from a list of contacts within the app.
When creating a Certification record, you should include details such as the type, part, serial number, certification number, lot number, and batch number. Additionally, assign a responsible inspector to oversee the certification process.
While viewing a certification, you can check the Verify conformance section, which includes fields like Conformity comments, Cert document, and Conformity checklist.
A conformity checklist is a list of criteria or tasks that must be met or completed to ensure a product meets certification standards. In Certifications, it is used to systematically verify and document that all necessary compliance steps have been followed. You can import checklists from the Checklist Creator App and attach them to the certification record.
If an inspector marks a certification as failed, its status will be updated to Failed in the status field.
You can assign a certification to a part by selecting a part while adding or editing a certification. To do this, you'll first need to make sure your organization has created parts.
Lot Number refers to a group of products with a common manufacturing history, while Batch Number refers to components produced in the same manufacturing run.
Yes, you can upload documentation directly to a Certifications record as proof of conformance. This allows you to provide detailed information about whether the product has obtained certification, ensuring transparency and compliance.
Changes
The Changes app manages change requests, minimizes disruptions, mitigates risks, and promotes continuous improvement within an organization.
In the Changes app, change requests progress through several stages, each representing a specific phase in the change management process. The stages include Draft, Approval, Approved, Rejected, Execution, Hold, Complete, and Closed. For detailed information on each stage please visit our Getting Started with Changes guide.
The Trigger field is where you can specify the primary reason or event prompting the requested change.
A champion of a change is a selected person from your organization who actively supports and advocates for a change initiative.
When changes are at a standstill, they can be managed by placing them in the Hold stage. This stage is used when progress on the change is paused or when modifications to the original plan are required. By categorizing the change in the Hold stage, your team can clearly understand that the change is temporarily halted, allowing for reevaluation and adjustments before moving forward.
For a change to be moved to the Approved stage you should:
- Submit a change request for approval
- Have the change get reviewed by responsible approvers
- The approver can either approve or reject the request. If approved, it will be moved to the Approved stage.
When a change is rejected, the record will transition to the Rejected stage, indicating that no further action will be taken based on the current details of the change.
When a problem is reported, it can be the catalyst for a change proposal. Once an issue is identified, you can create a change request within the Changes app and directly link it to the identified problem.
Checklist Creator
What is a Checklist?
A Checklist is a tool used to systematically go through a series of tasks or items, ensuring that each step is completed and nothing is overlooked. Think of it as a to-do list with added structure and organization. Checklists are commonly used in various contexts, from simple daily routines to complex project management processes. They help streamline workflows, improve consistency and reduce errors by providing a clear outline of tasks and ensuring that they are completed in a logical sequence. In the Checklist Creator app, users can design customized Checklists to fit their specific workflows and requirements, enhancing efficiency and accuracy in task execution.
What is the Checklist Creator used for?
The Checklist Creator app in Appward empowers users to design custom Checklists tailored to their specific needs, which can then be seamlessly integrated into various Appward applications.
How does it work?
With the Checklist Creator, users can build Checklists to standardize and organize processes across different aspects of their organization, such as internal audits, project pre-processes, event setups and more. The Checklist design is highly flexible, offering a variety of check types including yes/no, written response, buttons and multiple choice. Additionally, users can assign scores to each check, creating a grading criteria that impacts the overall score of the process being assessed. The app also allows users to test the checklist before implementing it and collaborate with team members through posts. The Usage tab provides visibility into where active checklists are being utilized.
A Checklist is a tool used to systematically go through a series of tasks or items, ensuring that each step is completed and nothing is overlooked. Think of it as a to-do list with added structure and organization. Checklists are commonly used in different contexts, from simple daily routines to complex project management processes. They help streamline workflows, improve consistency and reduce errors by providing a clear outline of tasks and ensuring that they are completed in a logical sequence.
A Checklist Object is the specific item or entity within Appward to which your checklist will be linked.
A checklist can be in one of two stages: Draft, where it is still being worked on, or Published, where it is finalized and available for use by your organization.
The steps to create a checklist include: naming and defining the checklist’s purpose, selecting application columns, incorporating queries, setting parameters, and building checks.
Yes, you can resize the caption field by dragging the right side or bottom to adjust its proportions.
Yes, use the Change Index button to adjust the order or position of the checks.
You can test your checklist by using the Run Test button, which allows you to preview the checklist from the user’s perspective and ensure it’s ready for publishing.
Application columns refer to the specific data columns from your organization’s data tables that you can include in your checklist to integrate relevant information.
No, custom queries are not required but are an option if you want to incorporate specific information from your data tables into your checklist.
Client Discovery
What is a Client?
In the context of the Appward ecosystem, a client refers to an individual or entity that uses the organization's Appward system to access its applications and services. These clients could be employees, customers, partners or any other authorized users who interact with the organization's digital platform.
What is Client Discovery?
Client Discovery in Appward is a tool designed to provide real-time insights into the users (clients) currently logged into your organization's Appward system.
How does it work?
Client Discovery acts as your digital lookout tower, allowing you to monitor and track the activity of users accessing your organization's Appward system.
Key Features:
-
Real-time User Monitoring: Client Discovery provides a comprehensive list of all users currently logged into your organization's Appward system, offering up-to-the-minute visibility into user activity.
-
User Details: It furnishes detailed information about each logged-in user, including their username (the user from the organization), the exact date and time of their login, and their IP address.
-
Insightful Metrics: By displaying the exact number of logged-in clients, Client Discovery offers an instant overview of user engagement and system usage within your organization.
-
Security Monitoring: Client Discovery helps you identify and monitor unauthorized access attempts by providing visibility into the IP addresses from which users are logging in, aiding in the detection and response to potential security threats in real-time.
Why is it important?
Client Discovery is crucial as it provides valuable insights into user activity within your organization's Appward system:
-
Real-time Monitoring: Track user activity as it happens to stay informed and proactive in managing system usage.
-
Security Awareness: Maintain a secure and protected system environment by gaining visibility into logged-in users and their IP addresses.
-
User Engagement: Understand user engagement patterns and identify opportunities for enhancing user experience and system usability.
In summary, Client Discovery serves as a powerful tool for gaining real-time visibility into user activity within your organization's Appward system, empowering you to make informed decisions, ensure security compliance and optimize user experience effectively.
In the context of the Appward ecosystem, a client refers to an individual or entity that uses the organization's Appward system to access its applications and services. These clients could be employees, customers, partners or any other authorized users who interact with the organization's digital platform.
Companies
Appward Companies is designed to centralize contact information and maintain connections with organizations in your network. By linking contacts to company profiles, you can easily identify key individuals within an organization, improving your customer relationship management.
From the company's details, click either the Delete or Archive button based on your requirements to manage company records that are no longer active or relevant.
Qualification statuses are labels used to indicate the current relationship or approval level of a company within your organization. These statuses help identify the role and trust level of external partners, clients, and suppliers. To qualify a company, simply check the Qualification checkbox, which will apply a green checkmark to the company's profile image.
You can search for a company using either the alphabetical filter buttons or the search box located at the top of the app screen.
Appward supports collaboration with the use of posts, files and notes. Posts allow for real-time updates and discussions, improving team communication. Files can be securely uploaded and shared, ensuring access to essential documents and facilitating collaborative editing and feedback. Notes serve as a repository for ideas and meeting summaries, organized for easy retrieval.
You can view the Usage tab to see which projects, sales orders, or parts are linked to a specific company, providing you with a comprehensive view of its involvement across your organization.
Yes, when adding a company, you can specify whether it is a vendor, a customer, or both. Vendors are companies from which you purchase goods or services, while customers are companies to which you provide goods or services.
Conversations
Appward’s Conversations app facilitates interactions and maintains detailed records of communications with your team, customers, partners, and vendors.
Yes, you can send emails directly within the Appward interface. Thanks to our API integrations with Gmail, Outlook, and other email services, you can manage your emails seamlessly without leaving the platform.
A helpful feature of the email popup is the Select from template button, which allows you to choose from predefined email formats and content structures. This enables you to quickly create professional-looking emails without having to start from scratch, saving you time and ensuring consistency.
Public means anyone in your organization can see the Conversation and its details, and Members only means only the people included in the Conversation will be able to see the record.
When entering contact information for an email in Conversations, the available contacts are automatically imported from your organization's Contacts app.
Appward makes it easy to host video calls with your team within the Conversations app. Video calls utilize the microphone and camera of your choice and offer features similar to other video messaging apps, including live messaging/chat, recording, snapshots, and more. For more information, please check out our Getting Started with Conversations guide.
Conversations are integrated across multiple apps within Appward, not just the Conversations app.
In any app featuring a Conversations tab, the functionality closely mirrors that of the Conversations app. You can view all conversations sorted by the most recent activity and access the same detailed information you would typically see in the Conversations app.
When sending an email through Appward, you’ll need to authenticate yourself as the person with access to the Sender email. This means providing the correct password for that email account. Depending on your email service (Gmail, Outlook, etc.), a verification popup will appear after clicking Submit & send email.
Email – Manage and send emails from any of your mailboxes directly within the Appward interface.
Video Call – Host video chats with organization members and maintain a complete record of the discussions.
Phone Call – Make phone calls to customers, vendors, partners, and more while recording and keeping detailed logs of each call.
Meet Up – Track in-person discussions, making it perfect for important interactions, presentations, and networking opportunities.
Yes, while creating an email-style conversation, you have the option to drag and drop or upload .eml or .msg files.
Database Manager
What is a Database?
A database is like a digital warehouse where you store and organize information in a structured way. Think of it as a giant electronic filing system that holds all sorts of data about your business – from customer details to inventory records to sales transactions.
Why is it important?
A database is crucial for a business because it serves as the backbone of all its operations. Here's why:
-
Centralized Storage: Instead of keeping information scattered across various files and documents, a database provides a centralized location to store all your data. This makes it easier to access and manage information efficiently.
-
Data Organization: A database allows you to organize your data into categories or tables, making it easier to find and understand. For example, you can have separate tables for customers, products, and orders, each with its own set of information.
-
Scalability: As your business grows, so does your data. A database provides the scalability to handle large volumes of information without sacrificing performance or reliability.
What is Database Manager used for?
The Database Manager in Appward is a tool that helps you organize and work with your organization's data in a straightforward way.
How does it work?
This app acts a digital filing cabinet where you can store, view and modify different types of information that power your organization's apps.
Key Features:
-
Database Selection: Choose which database you want to work with - either your organization's main database or your own personal one.
-
Table Management: See a list of all your data tables. Clicking on a table lets you see its structure (the columns it has) and its content (the records it holds).
-
Data Editing: You can edit existing data, add new data or remove outdated information directly from the Database Manager.
-
Table Customization: Rename tables, move them between different areas (like from organization to personal), or create new tables as needed.
-
Column Customization: Adjust properties of individual columns within a table, such as their type or size, to better fit your data.
Why use the app?
Managing your organization's data effectively is crucial for making good decisions. The Database Manager helps you:
- Understand your data better: By seeing how it's organized, you can get insights into your business.
- Keep your data accurate: You can easily make changes to ensure your information stays up-to-date.
- Adapt to changes: Customize your database structure to match the needs of your business as they evolve.
In summary, the Database Manager is a practical tool that lets you take control of your organization's data without needing to be a technical expert. It's designed to make managing data simple and efficient, helping you get the most out of your information.
Deletions
What is Deletions used for?
Deletions in Appward is a critical tool designed to serve as a record recovery system for all Appward applications.
How does it work?
Deletions is your safety net for accidentally deleted records, providing you with the ability to recover any deleted record from any Appward application within a five day period.
Key Features:
-
Record Recovery: With Deletions, you can restore any accidentally deleted record from any Appward application. Whether it's a contact from the Contacts app or a card from the Boards app, Deletions has you covered.
-
Visibility into Deleted Records: Deletions allows you to see what the deleted record was, who deleted i, and from which app it was deleted.
-
Time Limit: Deleted records are retained in Deletions for a period of five days, giving you ample time to initiate the recovery process. After this time frame, the record is permanently deleted and cannot be recovered.
-
Comprehensive Coverage: Deletions seamlessly integrates with all Appward applications, ensuring that no matter where the record was deleted from, you can retrieve it with ease.
-
User-Friendly Interface: The interface of Deletions is intuitive and easy to navigate, making it simple for users to locate and recover deleted records quickly and efficiently.
Why is it important?
Deletions is essential because it provides a safety net for accidental deletions, ensuring that valuable records are not lost permanently. Here's why it matters:
-
Accident Prevention: Mistakes happen, but Deletions ensures that even if a record is accidentally deleted, it can be recovered quickly and easily.
-
Data Integrity: By offering a record recovery system for all Appward applications, Deletions helps maintain the integrity and completeness of your organization's data.
-
Peace of Mind: Knowing that deleted records can be recovered within a five-day window provides peace of mind and confidence in the data management processes.
In summary, Deletions is a crucial tool for maintaining data integrity and ensuring that accidental deletions do not result in permanent data loss. It provides a reliable solution for record recovery across all Appward applications.
The Deletions app consolidates records from all Appward apps that include delete functionality, providing a centralized location for managing deleted items.
You have up to five days to recover a deleted record.
Yes, you can view the member from your organization who deleted the record by viewing the contact found in the Who deleted it field.
You can view the name of the app which the record originated from in the App field.
Deliveries
The Deliveries app is used to manage and track deliveries, providing updates on delivery status, customer comments, and team communication.
Yes, you can track the status of a delivery in real-time using the Tracking Number field to monitor the shipment’s location and updates.
Status indicates the current stage of the delivery process, such as Expecting Delivery, Arrived, or Complete.
To mark a delivery as urgent, you can create and assign a specific type or tag, or use attributes to highlight the urgency. This ensures that urgent deliveries are easily identifiable and prioritized accordingly.
When defining companies for deliveries, this can be done either when adding a new delivery or while creating a new company. During this setup, you can specify the company's role by selecting the appropriate checkboxes for vendor, customer, or both, depending on your requirements.
To reschedule a delivery, update the Leaving Date and Arrival Date fields within the frontline of a Deliveries record.
To specify a trucking company, select the desired company from the Truck Company field. This field will present a curated list of companies identified as trucking companies within your organization.
Currently, you can only assign one driver per delivery in the Driver field. For complex logistics requiring multiple drivers, you may need to create additional records or use attributes for additional information.
Notifications about delivery status changes, delays, and successful completions can be configured to be sent automatically to selected contacts through the Notifications field.
Yes, you can link a purchase order directly to a delivery. You can create a record to link in the Purchase Orders app.
Departments
Departments are the foundation of your organization, offering the structure, specialization, and coordination necessary to achieve your company's goals. The Departments app allows you to create and manage departments efficiently within your organization.
Departments are fundamental and are used in many of the core Appward apps such as Positions and Training Director.
Department positions are created in the Positions app.
Yes, you can view the employees and their positions within a department. Select the department from the Departments tab, and a detailed view will display all the employees and their corresponding positions within that department. This allows you to see each employee's name, picture, and their role in the organization.
By default, departments are sorted alphabetically.
Development Tracker
What is scripting?
Scripting refers to the process of writing code to automate tasks or perform specific actions within software applications. In the context of the Appward platform, scripting involves writing code to customize the behavior of applications, create new features or integrate with external systems. Scripting allows developers to extend the functionality of the platform and tailor it to meet the unique needs of their organization. With the Development Tracker, you can track all changes made to these scripts, ensuring that development activities are well-documented and transparent.
What is the Development Tracker used for?
The Development Tracker app in Appward is a powerful tool designed to keep track of all script and screen development activities within the Appward platform.
How does it work?
The Development Tracker provides full traceability of scripting and development changes by capturing important details such as when a change was made, who made the edit, the amount of time spent on development and the specifics of the change itself.
Key Features:
-
Change Tracking: You can see whenever a change is made to an Appward script or screen, ensuring that every modification is documented for future reference.
-
User Identification: The Development Tracker identifies who made each edit, allowing you to quickly find out who is responsible for specific changes.
-
Development Metrics: It tracks the amount of time spent on each script or screen development, giving insights into project timelines and resource allocation.
-
Detailed Change Descriptions: For each change, you get a description from the developer, explaining the purpose and scope of the modification.
-
Object Specifics: The tracker provides information on the particular object affected by the change, including the Appward object class name, quick script, object path and the actual new script.
Why is it important?
The Development Tracker is essential for ensuring accountability, transparency, and efficiency in script and screen development within the Appward platform:
-
Accountability: By identifying who made each change, the Development Tracker encourages accountability and responsibility among developers.
-
Transparency: It provides a clear and detailed history of development activities, allowing stakeholders to understand the evolution of scripts and screens over time.
-
Efficiency: With quick access to development metrics and detailed change descriptions, users can quickly search for specific changes and understand their impact without needing deep technical knowledge.
Scripting refers to the process of writing code to automate tasks or perform specific actions within software applications. In the context of Appward, scripting involves writing code to customize the behavior of Appward apps, create new features or integrate with external systems. You can use scripting within the platform to make your own apps and meet the unique needs of your organization.
Documents
Appward’s Documents app is designed to help you create a comprehensive library of documents and media assets essential for everyday operation of our organization.
Yes, you can edit files directly within Appward by pressing the Edit file button in the top right corner of the document.
Custom attributes are specific characteristics or properties defined by your organization to provide additional information about different types of documents. These attributes are unique to your organization's needs and help in categorizing and organizing documents more effectively.
Members Only: Only specific members assigned to the document can view or edit the document.
Public: Anyone within the organization can view the document. Editing permissions may still be limited to members only.
Yes, you can upload password-protected documents to the Documents app. You will be prompted to enter the password when attempting to access the document.
From Your Computer: Upload files directly from your local device.
From Appward Cloud: Select files from your organization’s Appward cloud storage.
Document versions are tracked iterations or updates of a document that manage changes over time. They help maintain a detailed history of changes, allowing you to revert to previous versions when needed and ensuring consistency and accuracy.
Editing privileges depend on the access levels you set for your document. If you choose "Members only," only the assigned members can edit the document. If the document is set to "Public," anyone in your organization can edit it.
Appward’s Documents app supports all file formats.
Drawings
Drawings refer to detailed technical documents that provide visual representations of a product or component. Appward's Drawings app is used to communicate design specifications , manufacturing requirements, and assembly instructions to engineers, designers, manufacturers and suppliers.
The Drawings app is used by manufacturers, designers, engineers, and suppliers involved in the process of creating and managing technical drawings and related documentation.
You can add as many revisions of a drawing as you need to. Each revision is associated with a new file, giving you full transparency on the progression of a drawing. For more on how version control works in the Drawings app , please check out our Getting Started with Drawings guide.
Redlines are annotations made on drawings to indicate changes or corrections. They help your organization in visually communicating modifications and ensuring that updates are clearly identified and implemented.
When viewing a drawing, you can click on the folder icon to bring up the Appward file explorer.
In Drawings, sheets refer to individual pages or segments of a drawing revision. Each sheet can contain different views, details, or aspects of the design and help you organize and present information clearly.
To "Release" a drawing means to finalize and approve it for distribution or use in production. To "Return" a drawing means to send it back for revisions or further review before it can be finalized and released.
As release package progresses through it's life cycle, it goes through the following stages:
Packages Requested: This is the initial stage where a release package has been requested.
Working: In the Working stage, the release package is actively being prepared and reviewed.
Printed: During the Printed stage, the release package has been finalized and printed out, if required.
Released: The Released stage indicates that the package has been officially approved and distributed for use.
Return Requested: If there are issues or required changes after the package has been released, a Return Requested stage is initiated.
Returned: In the Returned stage, the package has been returned to the Working stage for revisions. Changes are made according to the feedback received, and the package is updated accordingly before potentially proceeding through the cycle again.
Release packages are collections drawings and related documents bundled together for distribution or review. In Appward, release packages contain information from other apps such as source, project, sales order, purchase order, and customer information.
A drawing series is a set of related drawings that share common characteristics or specifications.
Employees
The Employees app is used to streamline all employee-related data and processes. You can quickly access and update your team’s information, manage personal events, maintain sensitive data, and reduce the time and effort required for routine administrative tasks.
Access to sensitive employee information is restricted to users with the appropriate roles and permissions, which can be managed in the Admin app.
You can manage a wide range of employee data, including general information like contact details, position, and department, as well as sensitive information such as wages, SSN, personal events, and related data like time-off requests and training records.
Yes, the Employees app is designed with security in mind. Sensitive information is protected by role-based permissions, ensuring that only authorized users can access, edit, or manage this data.
Employee onboarding involves adding the new employee into the system, assigning them roles and departments, providing training, and updating their information.
If an employee is not listed as a contact, the app will automatically create a contact for them during the employee creation process.
Yes, you can view the assigned training in the Training tab. You'll see training status, score, topic, class name and important dates. Please view our Getting Started with Training Director guide to learn more about how it works.
An employee can be designated with different statuses such as Active, Inactive, or Terminated, depending on their current employment situation.
Employee offboarding includes marking the employee as terminated, updating their termination details, archiving their data if necessary and adjust account permissions.
Expenses
The Expenses app helps employees efficiently track and manage their expenses. It allows users to list expenses, attach receipts, create detailed reports, and streamline the approval process with managers, ensuring accurate and timely reimbursements.
Line Items are the detailed entries within an expense report, each representing a specific expense. These entries include details such as the date of the expense, the vendor, the amount spent, and a description of the purchase.
Total spending is calculated by summing up all the individual expenses listed as line items within the report, providing you with an overall amount spent during the specified time frame.
An expense report can be in one of several statuses: Draft (in progress), Approval Requested (awaiting approval), Approved (accepted), Denied (rejected), or Returned (sent back for revisions).
You can search for specific expense reports using the search bar at the top of the Expenses app screen. Enter search parameters such as Report ID, Report Title, Status, Description, Manager, or Total Cost to find the records you're looking for?
Yes, when you submit an expense report for approval, the designated managers or stakeholders are automatically notified, ensuring that they review and act on the report promptly.
The access levels available are Public or Members Only. If set to Public, anyone in your organization can view the record. If set to Members Only, visibility is restricted to the contacts you assign as members, ensuring controlled access.
Universal Members have broader access across the app, allowing them to view and manage any Expenses record by default.
You can modify the list of universal members by pressing the settings button found in the top right corner of the app screen. To make any changes, you'll need to be an approved admin in your organization.
Forum
The Forums app in Appward is designed to simplify communication within organizations. It provides a centralized platform where employees can engage in discussions, share files, and collaborate in real-time, enhancing productivity and efficiency.
Subscribing to a forum ensures you receive notifications and updates about new posts, replies, or activities within that forum. It allows you to stay informed about ongoing discussions and engage with the content more effectively.
Yes, you can reference records from any app using AppShare. Simply type the "#" symbol to see a list of records you can select from. For more details on how AppShare works, please refer to our guide on Posts.
No, there is no limit on the number of people you can include in a forum. You can add as many members as needed.
You can create chat forums using by clicking the chat icon in the sidebar and pressing the +new button, or by adding a new record in the Forums app.
If a forum's access level is set to "Members Only," only the designated members will have access to view and participate in discussions within that forum.
Yes, you can create as many subforums as you need to.
Quick responses allow you to generate and personalize frequent responses to streamline your reply time. Click the + icon to create a quick response.
Forum: A designated space for discussions, sharing files, and keeping information organized.
Subforum: A subset within a larger forum, focusing on specific themes or subtopics.
Goals
The Goals app is an individualized growth-tracking app that encourages productivity and development through planned-out objectives. It helps manage both short and long-term goals for you and your team.
Members in a goal are individuals from your organization who have been given access to a goal by the creator. Members can track or manage the assignee's progress. They can also collaborate and provide input if required within the details of the goal.
When you mark a goal as Complete, you have the option to notify the assignee and any member involved with the goal. This can be done through the notification options that appear.
Yes, you can create private goals by selecting the Private checkbox during the process of adding a goal.
Yes, goals can be linked to reviews created in the Reviews app. You can view the linked reviews in the Reviews linked to this Goal field.
The Status field determines the current state of the goal. A newly created goal starts in “Draft” mode. Changing the status to “Active” assigns the goal to the assignee. Once the goal is completed, the status can be changed to “Complete”.
No, each goal can only be assigned to a single person. However, you can add multiple members to track progress and collaborate on the goal.
You can track time spent on a goal within the Timelog tab. Start and stop the timer as you make progress towards the completion of your goal.
You can set reminders for a goal by clicking on the Reminders button in the goal's details. Specify the person, date, and message for the reminder.
If a goal is in draft mode, it will only be visible to the creator of the goal until it is published publicly.
Help Creator
What is Help Creator used for?
The Help Creator app in Appward is a tool for making helpful content like guides and tutorials. You can organize it neatly and make it easy for users to learn about any topic you want.
How does it work?
With Help Creator, you can arrange your content in folders, like a digital filing cabinet. Inside these folders, you can create documents, chapters and topics to explain different things.
Key Features:
- Structured Content: Arrange your content neatly in folders to make it easy to find.
- Formatting Options: Make your content look nice with text styles, images, and links.
- Collaboration: Work together with your team to create and edit content.
- Version Control: Keep track of changes and go back to earlier versions if needed.
What can I create with Help Creator?
You can create guides, tutorials, manuals or anything else to help users understand your product or service better.
Why is it important?
Help Creator makes it easy to create helpful content for users, improving their experience and making it easier for them to learn and use your product or service.
Importers
What is the Importers app used for?
The Importers app in Appward helps bring data into your organization's database easily. Whether it's contacts, leads or any other important information, Importers lets you upload data from spreadsheets or through API calls.
How does it work?
Using Importers is simple: you upload spreadsheets with your data or make API calls to fetch information directly into your database. Then, you can decide how each piece of data should be organized within the database.
Key Features:
-
Data Importation: Easily bring in data from spreadsheets or other sources like API calls.
-
Flexible Mapping: Decide where each piece of data should go in your database.
-
Streamlined Process: Save time by avoiding manual data entry and reduce errors.
-
Bulk Import: Bring in lots of data at once, making your work faster.
Why is it important?
Importers makes data management easier by automating tasks and giving you control over how your data is organized. This means less manual work, fewer mistakes, and better decision-making for your organization.
Appward offers helpful tools and services to streamline data import processes. Firstly, there's the Getting Started feature, specifically designed to assist new organizations in onboarding seamlessly. This feature helps import essential company details like Departments, Positions, Companies, Contacts and Employees into their respective apps. You can choose from a default list provided by Appward or add your own custom data.
Secondly, there's the Importers app, a powerful tool for bulk data import. This app allows you to efficiently import large quantities of data via spreadsheets. You have full control over what data you import and how you want to utilize it, whether it's creating Employees, Departments, Leads or other records.
If you require any assistance throughout the data import process, you can easily reach out to Appward support. They're available via phone at (818) 833-0088 or through email at support@appward.com. With these user-friendly tools and support services, Appward simplifies the data import process, ensuring a smooth transition for your organization.
Inspections
The Inspections app helps you manage quality control by enabling you to create checklists, reference specifications, log issues, and generate reports. It centralizes and tracks inspection activities across your organization, ensuring you maintain high standards of quality, compliance, and improvement.
Inspection types are classifications used to categorize inspections based on their specific focus or requirements. They are visually represented with custom names, colors, and images, allowing you to organize and manage inspection data according to your business needs. For more on types, please visit our Using Types guide.
The evaluator is responsible for assessing the inspection results, determining compliance with standards, and providing feedback. They review the findings, document their evaluation
The stages of an inspection include:
- Pending: The inspection is scheduled but not yet started.
- Active: The inspection is currently in progress.
- Evaluate: The results are being assessed against established standards.
- Closed: The inspection is completed, and the results have been processed.
To associate a checklist with an inspection, click the Change Checklist button which will bring up a list of your organization's existing checklists. Select the desired checklist from this list to associate it with an inspection. For more on checklists, please check out our Getting Started with Checklist Creator guide.
No, the Inspections app currently supports assigning only one inspector per inspection.
Yes, Inspection data can be exported by generating reports. These reports are available in PDF format and can be downloaded from the Reports tab.
The project list may be empty if no projects have been created in your organization yet. You can read more about projects and how they are created by visiting our Getting Started with Projects guide.
By pressing the Settings button in the top right corner of the app you can bring up the Configure Settings popup. Here you can customize various aspects of your inspections, including assigning custom background colors, foreground colors, result labels, and other settings related to the pass/fail status of inspections.
Installations
The Installations app is a centralized solution for tracking and manage installations, including schedules, product details, and customer requirements.
Yes, you can link parts directly to an installation by selecting a part from your organization's inventory directly in the front line of an installation.
Yes, you can add custom attributes to an installation. These attributes allow you to include information beyond the default fields, and they can be configured by app , type, or individual record.
An Installations record includes the installation title, description, part, manufacturer, customer, install date, model number, and serial number. For a more in-depth explanation, please visit our Getting Started with Installations guide.
Support contracts are typically associated with installations to track and manage ongoing customer support related to the installation. These contracts can help ensure that post-installation services are properly recorded and maintained. These support contracts are created in the Support Contracts app and then linked to an installation.
Yes, the Installations app integrates with the Google Map API to visualize customer addresses and provide interactive maps for installations.
Inventory
The Inventory app is used for managing and tracking inventory levels within your organization. It provides up-to-date visibility of products and components, helping ensure optimal stock levels and efficient stock management.
Batches are groups of parts produced or purchased together as a set. They help manage inventory by tracking the origin, quality, and pricing consistency of items purchased at different times or prices.
Pulls are requests to remove items from inventory for a specific purpose, such as fulfilling orders. Put Aways refer to placing received items into their designated storage locations within the inventory.
Max quantity indicates the highest acceptable amount of a specific item to keep in your organization's inventory. Min quantity indicates the lowest allowable amount to avoid running out of stock.
Stock limits are preset thresholds that your organization defines for the minimum and maximum quantities of items to maintain in inventory. They are important because they help prevent both overstocking and stockouts.
Available: The batch is currently in use and available for inventory transactions.
Return to Vendor: The batch is set aside to be returned to the vendor.
Damaged: The batch is unusable due to damage and should not be used.
Hold: The batch is temporarily on hold for quality checks or other reasons.
Expired: The batch has passed its expiration date and should no longer be used.
Additionally, you can create custom statuses to fit your organization's needs.
In the Transactions tab, you can view a comprehensive list of all inventory transactions. Each transaction entry includes details such as the transaction type, date, the individual who created the record, and the app where the transaction took place. The transaction types you can see include Add, Adjust, Scrap, Pull, and Put Away.
Yes, the Inventory app provides real-time updates on inventory levels, allowing you to monitor stock status continuously.
You can create certifications in the Certifications app. When creating or managing an inventory record, you can select from a list of existing certifications.
Labor Tracking
Labor Tracking offers a comprehensive solution for monitoring employee productivity. You can easily track work hours, compare estimates with actual time spent, and generate customizable reports for insightful labor metrics. For more, please check out our Getting Started with Labor Tracking guide.
Allocations in Labor Tracking refer to the recorded labor entries. They include details such as the Allocation ID, total count of hours, employee name, duration, start and end dates, project, customer, work order, and work order step.
Information about the linked work order includes the work order number and the specific work order step associated with the labor allocation.
If you don’t see any employees in the Labor Tracking app, it’s likely because employee profiles have not been set up in the Employees app. The Labor Tracking app uses data from the Employees app, so make sure that employee profiles are created and properly configured in the Employees app before using Labor Tracking.
Employees can be sorted by clicking on the first letter of their name using the list of letters in the sidebar. Highlighted letters indicate employees with names starting with that letter, while greyed-out letters indicate the absence of such employees in the list. Additionally, you can perform a traditional search using the search bar at the top of the app screen.
Keypads in Labor Tracking are used to facilitate easier and more efficient data entry on tablets and handheld devices. They help users search for projects and enter hours spent without using a traditional keyboard.
If a project has no subassemblies, select the "Work steps with no subassembly" option during the labor entry process.
Leads
The Leads app is used for capturing, tracking, and managing potential customers who have shown interest in your product or service. It helps in organizing and following up with leads to convert them into paying customers.
Auto-numbering in Leads automatically assigns a unique identification number to each new lead, ensuring easy reference and tracking. This system generates numbers sequentially based on a customizable format, which can include prefixes and specific patterns. To view a guide on different configuration options view this article.
Yes, you can view any conversations initiated via the Conversations app within the Conversations tab.
Agents in a Lead are the sales representatives or team members assigned to manage and follow up with the lead. They are responsible for nurturing the lead through the sales process, addressing inquiries, and facilitating the lead's progression through the pipeline stages. Agents ensure that each lead receives personalized attention and is effectively guided towards conversion.
Follow-ups in Leads refer to scheduled interactions or tasks aimed at maintaining contact with leads. They ensure that potential customers are consistently engaged and guided through the sales process. Follow-ups can include phone calls, emails, meetings, or reminders for any other future actions.
1. Access the settings menu by clicking the settings button (Upper right hand corner).
2. Navigate to the settings you want to adjust such as lead types, pipeline stages, automations, agent management, and more.
3. Apply your changes by pressing submit.
To process an approval for a lead:
- Go to the Approvals tab in the lead’s details flyout.
- Click the + button next to the search bar to create an approval request.
- Select the approvers who need to approve the lead request.
- Submit the approval request for processing.
Note: If you are an approver and receive a notification requesting your approval, click on the notification. It will take you the section in Leads where you can approve or deny the request.
Yes, you can add as many contacts to a lead as you deem necessary.
Pipeline stages represent the different phases that a lead goes through in the sales process, from initial contact to final conversion. Each stage indicates a specific point in the sales journey, such as lead qualification, proposal, negotiation, and closure.
Lead status indicates the current state or condition of a lead within your sales process. It helps in tracking the progress and determining the next steps needed for converting the lead into a customer.
Licenses
The Licenses app is used to help you efficiently manage and monitor licenses related to your organization. You can track customer payments, monitor license statuses, oversee license details, and safeguard your organization's financial assets.
License Agreements are official documents detailing the terms and conditions under which a license is issued to a customer.
You can manage various types of licenses, from software licenses to service agreements.
You can link assets directly to a license by selecting from a list of your organization's assets. This helps you keep track of assets that are associated with a license.
Yes, you can manage customer payments by associating a customer with a license in the Customers tab.
Yes, you can assign specific installations to a license by selecting the installation within the front line of a license.
Access levels for a license can be set as either public or members only. Public licenses are visible to everyone in your organization, while members only licenses are restricted to specific members that you assign.
When a license expires, the status will change to "Expired", and the expiration date will be displayed in red text on the record for clear visibility.
Yes, you can change the expiration settings by clicking the settings button in the top right corner and modifying the options there.
The Customer Information field shows the addresses associated with a customer. You can also view the company's location on a map using the integrated Google Maps feature.
Locations
The Locations app is used to designate specific spaces within you organization's premises and define their intended purposes. It helps manage these locations, ensuring efficient use and control over business operations.
Yes, you can designate departments for specific locations. This helps you categorize locations by department or function.
No, each location is assigned to a single address. However, you can create multiple locations if needed, each with its own address.
Yes, once you have inputted the address details, you'll see an interactive map generated by the Google Maps API within the front line of a record.
The app offers two views: Wide view which gives a zoomed-out overview of the location and Zoom view, which provides a detailed close-up, including streets and landmarks.
You can specify multiple entrance in the Address Name or Description fields to clarify the location's layout for your organization.
Yes, you can add new companies while adding a location, even if you have not added any locations previously.
Latitude and Longitude represent the precise geographic coordinates of a location, with latitude indicating the north-south position and Longitude indicating the east-west position.
Locations are integrated with other apps, such as the Maintenance Director app, where they are used to specify the spaces where tasks or operations will take place.
Maintenance Director
The Maintenance Director app is used for efficiently managing and tracking essential work tasks. With Maintenance Director you can ensure your business assets are functioning optimally by organizing and managing one-time or recurring tasks.
In Appward, maintenance tasks are assigned based on the business asset or location they are linked to. When creating a maintenance task, you can choose between Asset or Location, determining whether the task will be completed on a specific asset or location. You can also check both boxes if a task is for both an asset and a location.
Maintenance tasks will go through statuses such as Not Done, In Progress, and Complete during their life cycle.
Associated task templates are pre-built task structures that allow you to efficiently create new tasks. By using templates you can ensure consistency across similar or recurring tasks.
Yes, you can create recurring tasks by ticking the Recurring checkbox and defining the frequency and duration for the task.
Yes, you can view a list of employees and the specific tasks they are assigned to in the People tab.
The checklist popup will be empty if no checklists have been made by your organization in the Checklist Creator app.
Yes, you can keep track of the time it takes to complete a maintenance task by using the Start and Stop buttons. This will generate labor allocations and provide you with a detailed log of your work.
Notes
The Notes app is your personal space for capturing ideas, organizing thoughts, and staying on top of tasks. It gives you a place to jot down quick reminders, craft detailed plans, and collaborate with your team. Please visit our Getting Started with Notes guide to learn more.
The text editor in the Notes app offers formatting options such as bold, italics, underlining, lists, custom HTML and much more.
Yes, you can insert images, videos, and other files directly into your notes.
Yes, you can collaborate on notes across various apps within Appward.
You can use the up and down arrows on the note elements to move them around within the note.
Yes, the History tab in the Notes app logs activity across different apps that use the notes you are involved with. From there, you can click on the history item to jump directly to the specific note record you want to view more about.
You can create notes in almost every app in the Appward ecosystem. Additionally , you can create notes directly in the sidebar of your workspace by clicking on the + icon.
Yes, you can restore a deleted note by going into the Deleted Items folder and pressing restore.
To stop sharing a note, navigate to the note's sharing settings (cog icon in the top right corner) and remove the people you have shared it with. This will revoke their access.
Organizations
What is an organization?
An organization refers to a group of people who come together to achieve common goals and objectives. It can be a business, non-profit, government agency or any other entity that operates with a specific purpose. Within the context of the Organizations app, an organization represents an entity that is added to the Appward platform, where users can manage its information, users and resources effectively. Whether it's a company, department, team or group, the Organizations app provides tools for organizing and managing these entities within the platform.
What is the Organizations app used for?
The Organizations app in Appward is a tool designed to streamline the process of adding new organizations to the platform and managing existing ones.
How does it work?
With the Organizations app, users can easily add new organizations to the Appward platform by specifying the organization's name and adding users. The app also facilitates the smooth onboarding of organizations by allowing users to import information such as contacts, departments, positions and employees. Additionally, users can make any necessary updates to existing organizations and check their existing database.
Key Features:
-
Organization Creation: Easily add new organizations to the Appward platform by specifying the organization's name and adding users.
-
Smooth Onboarding: Import information such as contacts, departments, positions, and employees to facilitate the smooth onboarding process for new organizations.
-
Updates and Maintenance: Make any necessary updates to existing organizations and ensure their database is up-to-date.
-
Database Check: Quickly check the existing database to ensure accuracy and completeness of information.
Parts
The Parts app is designed to streamline the process of managing parts in inventory and provide you with a user-friendly solution for effective part tracking.
The Manufacturer Part Number (MPN) is a unique identifier assigned to a part by the manufacturer, while the SKU (Stock Keeping Unit) Number is a unique identifier created by the retailer or distributor to manage inventory internally.
Transactions in the Parts app are records of activities involving parts, such as additions, removals, purchase orders, sales orders, and more. These transactions help track inventory changes and provide a history of how parts are used or moved within the organization.
Item bundles are collections of individual parts or products grouped together and treated as a single unit.
You can store manuals, safety sheets, or any other necessary documents within the Files tab of a part's front line.
Yes, you can view the usage for a part within the Usage tab of a part's front line.
You can view the changes made to a part by viewing the History tab within the part's front line.
To add and manage distributors for a part, you can visit the Distributors tab within a part's front line.
Yes, you can customize the units of measurement in the Parts app to fit your organization’s specific needs. This customization allows you to define and manage units of measurement, such as quantities, weights, and volumes.
Yes, this can be done using Appward's Importers app.
Platform Guide
Appward's access control system is designed to tailor app access for different users, ensuring maximum efficiency and security. Admin-level users enjoy top-tier access, granting them permission to all apps within the platform. This means they have full control and visibility across the board. On the other hand, lower-level users' access is customized by admins. They only see the apps relevant to their roles and responsibilities, ensuring they focus on what matters most. With this system, you can confidently manage access levels, safeguarding sensitive data and streamlining workflows. Whether you're an admin overseeing the entire organization or a lower-level user focused on specific tasks, Appward offers a seamless and secure user experience.
Our support team is available from 8:00 AM to 6:00 PM PST. Feel free to reach out to us via email at support@appward.com or by phone at (818) 833-0088.
You've got full control over your workspace appearance in Appward. Simply click on your profile picture in the top-right corner to access your User Settings. A popup will show up displaying your contact details. Click on the Settings button at the top to enter your account settings. From there, navigate to the Display tab, where you can customize your workspace background and adjust the colors of various Appward elements. With this level of customization, you can create a workspace that reflects your style and preferences, making your Appward experience truly personalized and enjoyable.
To log out, simply click your profile image in the top right corner, then click the Logout button from the top of the popup window that appears.
Appward's Spotlight Search feature simplifies the process of finding anything you need within the platform. To access it, click on the magnifying glass icon on the left side dock. Once opened, you can utilize various filters to narrow down your search, whether it's content from a post or specific app records. Refine your search by contact, timeframe or the type of object you're looking for. Once you've located what you need, effortlessly jump straight to its location within the platform. With Spotlight Search, navigating through Appward becomes intuitive and efficient, ensuring you find the information you need with ease.
Appward is fully accessible from your phone, offering a mobile-friendly version of the platform. With this mobile version, you can conveniently access your notifications and Forum posts. Stay connected with your organization, communicate with colleagues, and stay updated on important developments—all from the palm of your hand. Whether you're on the go or working remotely, Appward's mobile accessibility ensures you're always in the loop and able to stay productive.
To make sure specific individuals are notified when writing a post or message in Appward, simply use the @Mention feature. This handy tool allows you to select contacts, positions or departments within your organization. When composing your message, type the "@" symbol, and a popup will appear where you can search through your organization's contacts, positions and departments. You can mention as many people as necessary to ensure they receive the notification. Once you send out the message or post, all mentioned parties will receive a notification. What's more, recipients can easily navigate to the location of the post by clicking the external link icon for full context and connectivity. With @Mentions, staying informed and connected within your organization has never been easier.
By default, Appward apps are anchored to the home screen, occupying the full screen and positioned at the top right corner of the workspace. However, if you accidentally un-anchor an app by clicking and dragging it around, its tab will no longer appear at the top of your workspace. To re-attach or re-anchor the app, simply click the anchor icon located in the top-right corner of the app header. This action will restore the app to its original anchored state, ensuring it remains easily accessible from the home screen.
Yes, you can view multiple apps simultaneously in Appward by opening multiple browser windows. Since each app window maximizes to your screen size, this setup makes it easy to multitask and access different apps at once. With this simple approach, you can efficiently manage your tasks and workflows, enhancing your productivity with Appward.
Appward's deletion recovery system provides a 5-day window for recovering deleted records, ensuring that you never permanently lose valuable data. To recover a deleted record in Appward, follow these steps:
- Navigate to the Deletions app, located under the Utilities category.
- Within the Deletions app, search for the record you want to recover.
- Once you've located the record, hover over it to reveal the options.
- Click on the "Recover" button associated with the record.
- The record will then be restored and available again within your Appward account.
This feature offers peace of mind and safeguards against accidental deletions.
To remove a user from your organization in Appward, follow these steps:
- Access the Admin app, located under the Utilities category.
- Find the user you wish to remove from the organization.
- Select the user's record to view their details.
- In the top-right corner of the user's details flyout, click on the "Delete" button.
- Confirm the deletion when prompted.
To limit which apps users can access in Appward, you can use the Roles app found under the Utilities category. There are two ways to limit the apps of users:
-
Roles management
- Create specific roles with pre-set lists of available apps. Define the apps each role can access according to their responsibilities and permissions.
- Assign users to these roles based on their roles and responsibilities within the organization.
-
Utilize the Contacts tab to tailor app access for specific users
- Navigate to the individual user's profile within the Contacts app.
- Customize their access to apps according to their role, responsibilities and specific needs.
- Adjust their access rights by enabling or disabling access to specific apps as required.
By leveraging the Roles app and the Contacts app, administrators can effectively control and limit which apps users can access within Appward. This granular control ensures that users have access only to the tools and functionalities necessary for their roles, promoting security and efficiency within the organization.
Adding a new user to your organization is easy with Appward's Admin app. This tool, available in the Utilities category, is designed for admin-level users, making user management a breeze. Just open the Admin app, add the new user, connect them to an existing contact and set their permissions—all in one simple process. With its user-friendly interface and streamlined functionality, Appward takes the hassle out of managing users, making it a must-have for smooth organization management.
To reset your password in Appward, you have two options:
-
From the Login Screen:
- If you're logged out of the platform, navigate to the login screen.
- Click on the "Forgot password?" link located at the bottom.
- Enter the email associated with your account.
- If the email is found in the Appward database, a password reset link will be emailed to you.
-
From Within the Platform:
- If you're already logged in, click on your profile image in the top right corner of your workspace.
- Select the "Change password" option.
- A 6-digit code will be sent to the email linked to your account.
- Input this code into the window that pops up in Appward.
- Follow the prompts to reset your password.
Problems
The problems app is used for recording, tracking, and managing issues within an organization. It provides visibility across departments and stakeholders, facilitates structured workflows for resolving problems, and helps implement corrective actions. Additionally, you can use insights and metrics within the Problems app to analyze trends and ensure compliant with standards such as ISO 9000.
Using the Problems app helps your organization streamline the process of identifying, addressing, and resolving organizational issues. For a more in depth guide on how you can start using the Problems app to improve your organization, please visit our Getting Started with Problems guide.
You can track the source of a reported problem using the Caused by field within the details of a problem. Here, you can identify and select the entity responsible for causing the problem, if applicable.
Problems involving non-conforming products or materials are issues where products do not meet their specified requirements or standards. This could include defects, deviations from specifications, or materials that do not meet quality standards. These problems highlighted in an NCR(Non-Conforming Report) require specific dispositions and corrective actions.
The stages of a problem's life cycle are:
Draft: The initial stage where the problem is recorded but not yet detailed or assigned for further action.
Analyze: The stage where the problem is examined to identify its root cause and determine appropriate solutions.
Fix: The stage where corrective actions are implemented to address and resolve the problem.
Reinspect: The stage where the solution is reviewed and tested to ensure that the problem has been effectively resolved.
Complete: The stage where the problem is considered resolved and all necessary actions have been taken.
Closed: The final stage where the problem is formally closed, and no further actions are required.
NCR (Non-Conformance Report) dispositions refer to the actions taken to address and manage non conforming products or materials.
To enable notifications for problem progress, click the Settings button in the top right corner and select the option to activate notifications.
The different access levels of a problem are:
Member-based: Available to assigned members who have been given permission to view and edit the problem record.
Public: Visible to everyone within the organization, allowing all users to view the problem record.
Purchase Orders
The Purchase Orders app is used for managing and tracking the purchases made by your organization. It helps in adding new orders, tracking their statuses, following up with vendors, and viewing related requests, parts, and vendor information.
Yes, you can modify the PO number or any other additional information related to a purchase order after it has been created.
The statuses include:
- Draft: The order is still being prepared and has not been finalized.
- Price Confirmation: Prices for the items in the order have been confirmed.
- Purchased: The purchase order has been finalized and the items have been ordered.
- Shipped: The vendor has shipped the items in the order.
- Received: The items have been received by your organization.
- Putaway: The received items have been stored or placed into inventory.
- Closed: The purchase order has been completed and is now closed.
You can track confirmed prices with vendors in the the General tab within the Purchase Orders app.
Yes, you can create and download custom reports using the built-in reports feature. For more on how reports are generated in Appward, please visit our Getting Started with Report Builder guide.
You can track the transit time for a purchase order in the Transit Time field when viewing the front line of a Purchase Order.
Vendors are defined in the Companies app, where you can designate a company as a vendor or customer based on your organization’s need
The buyer is the specific contact from the organization that initiates the purchase order.
Queries
- SQL Query Writing: With Queries, you can write custom SQL queries to search for, retrieve and manipulate data in your organization's database tables.
- Data Retrieval: Use SQL queries to find specific records, extract insights and perform analyses on your business data.
- Data Manipulation: Besides searching for information, you can also use SQL queries to add, update or delete data directly from the database.
- Query Management: Save your SQL queries for future use, allowing you to quickly rerun them or tweak them as needed for different scenarios.
- Search with Precision: Write custom queries tailored to your specific data requirements.
- Manage Data Effectively: Perform data manipulation tasks with confidence, knowing that you're in control of your organization's data.
- Learn and Grow: Experiment with SQL queries to deepen your understanding of your data and improve your data analysis skills.
Report Builder
What is Report Builder used for?
Report Builder in Appward is a sophisticated tool designed to create beautifully formatted reports in PDF and Excel formats using data from your Appward applications.
How does it work?
-
Select Data: You start by choosing the data you want to include in your report. This could be sales figures, customer information, project updates or any other data stored in your Appward applications.
-
Choose App (Optional): If you're working with multiple apps in Appward, you can optionally specify the app from which you want to pull the data.
-
Customize Information: Next, you add in all the details you want to see in your report. This could include specific fields, summaries, charts or any other information relevant to your report's purpose.
Key Features:
-
Customizable Reports: With Report Builder, you have the flexibility to design reports that display exactly the information you need. Whether it's sales figures, customer data, or project updates, you can tailor your reports to meet your specific requirements.
-
Multiple Output Formats: Report Builder supports both PDF and Excel formats, giving you the freedom to choose the format that best suits your needs or preferences.
-
Highly Customizable: You can customize every aspect of your report, from the layout and formatting to the colors and fonts used. This allows you to create reports that match your brand's style and reflect your professionalism.
-
Data Integration: Report Builder seamlessly integrates with your Appward applications, allowing you to pull data directly from your databases and incorporate it into your reports. This ensures that your reports are always based on up-to-date and accurate information.
Why is it important?
Report Builder is important because it streamlines the process of creating professional reports, making it easy to communicate key information effectively. Here's why it matters:
-
Efficiency: With Report Builder, you can generate reports quickly and easily, saving you time and effort compared to manual report creation methods.
-
Accuracy: By pulling data directly from your Appward applications, Report Builder ensures that your reports are based on reliable and up-to-date information, reducing the risk of errors or discrepancies.
-
Professionalism: The ability to customize the appearance of your reports allows you to create polished and professional-looking documents that impress clients, stakeholders, or colleagues.
In summary, Report Builder is a powerful tool that empowers users to create custom reports with ease, allowing them to communicate key information effectively and professionally. Whether you need to generate sales reports, financial statements or project updates, Report Builder has you covered.
Ticket Director
The Ticket Director app is designed to manage incoming tickets for your organization. It helps track customer and internal inquiries, manage issues, and assign agents to resolve them.
Ticket Director is used to manage incoming tickets from customers and internal employees, while the Tickets app serves as a detailed viewer for tickets.
Pending: The ticket is created but has not been addressed by an agent yet.
Active: The ticket is being actively worked on by an agent, and efforts are being made to resolve the issue.
Hold: The ticket is temporarily paused, possibly due to pending information, resources, or external factors.
Closed: The issue has been resolved, and no further action is required. The ticket is marked as completed and archived.
Yes, you can add new types, topics, and subtopics when creating or editing a ticket. For more on how types work, please check out our Using Types article.
Yes, you can track the time it takes to resolve a ticket within the Timelog tab.
Closing a ticket marks it as resolved and removes it from the active ticket list.
Internal files are visible only to agents, while external files are accessible by customers and agents.
Yes, you can assign priority levels to tickets(e.g., High, Medium, Low) to help categorize and address tickets based on urgency.
Yes, you can access agent settings by pressing the Settings button in the top right corner of the app. This will bring up a menu where you can customize agent info such as role, company, image and more. Additionally, you can customize notification preferences and ticket view.
Yes, agents can reuse previously provided solutions. Ticket Director allows agents to search for and apply solutions from past tickets. They can use the Solution Search feature to find relevant solutions and transfer them to new tickets, streamlining the process and improving response efficiency for recurring issues.
Time Off
The Time Off app is designed to streamline the leave management process for both employees and managers. Employees can easily submit time off requests, track their remaining balances, and coordinate with their team's schedules. Managers can review and approve requests, view an employee's availability and ensure workflows remain uninterrupted.
The Time Off app provides three main views: Month, Week, and Day views. These views offer a detailed breakdown of time off requests, allowing users to navigate between full-month overviews, weekly schedules, and daily time off specifics.
Yes, you can submit partial-day time off requests by selecting the Partial Day option when creating a request.
You can check your remaining leave balance by clicking the Show available time button.
You can view a team member's availability through the calendar view. The calendar view displays upcoming approved and pending time off requests.
Yes, you can customize notification settings by clicking the Settings button and navigating to the Notifications tab.
You can set up your company's holidays in the Holidays section of the app's settings. Here, you can define holidays and their duration, which can then be displayed to everyone at your organization.
Yes, you can provide additional comments or reasons in the Reason or Comments field.
The employee will be notified of the rejection, and the request will be marked as Rejected.
Only individuals with administrative access can change the organization roles. You can manage admin status by using the Admin app.
Tours
The difference between a primary tour and general tour is that a primary tour is specialized—it holds settings to manage the Help Menu for its respective app. You can configure whether a tour is general or primary either when you're adding the tour:
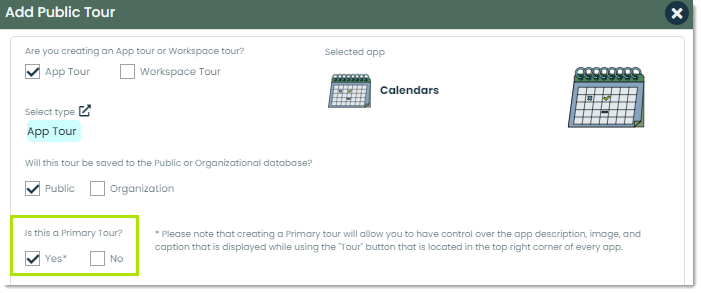
Or in the details of the tour:
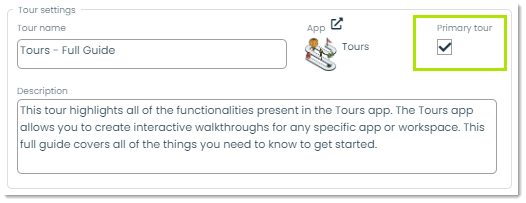
Each app can only have one primary tour. You'll find the Primary Tour Settings in any primary tour's details.

Here, you can adjust the Help Menu for the respective app. You can change the caption at the top, the description of the app, the colors of the popup, and the app image if necessary.
The differences between app and workspace tours are:
- App tours are meant to guide you through how to use an app while workspace tours are meant to guide you through the general platform
- App tours are linked to a specific Appward app while workspace tours are not
Tour step indexes are numbers which determine the order of your tour steps.
Yes, you can include any necessary media within the steps of a tour.
Draft: Tours with the Draft status will only be shown to the creator of the Tour and the selected members. These Tours are also not visible in the Tour Menu.
Published: Tours with the Published status are visible to the Public. They also appear in the Tour Menu in apps.
Blocked: Tours with the Blocked status are not visible inside of the Tour Menu. When you select the “Blocked” status, you will be warned with popup asking for confirmation to block the selected Tour.
Yes, you can create your own tours specific for your organization. Check out our Getting Started with Tours guide to learn more about that process.
In every app, you'll find a question mark icon in the top right corner. Clicking this icon will direct you to the help center, where you can access the available tours.
Public tours are available to everyone in all organizations, and organization tours are only available to members within your organization.
Yes, during the creation or editing of a tour, you can customize various styles for each step. This includes adjusting the popup color, font style, arrow style, and more to suit your preferences and enhance the user experience.
Whiteboards
Appward's Whiteboards app is a digital platform designed to replicate the functionality of traditional whiteboards, while integrating many of the robust Appward-native features. It integrates with various apps in the Appward ecosystem, facilitating brainstorming, idea visualization, and project management.
Yes, you can categorize your whiteboards by assigning a Type to them, such as “Audit” for an audit-related whiteboard. For more on types, please check out our Using Types guide.
Yes, you can add images to your whiteboard. For more on how to add images to a record, please check out our guide on Appward's file system.
The Status field tracks the progress of a whiteboard, indicating whether it is in Draft, Live, or Published stage.
Draft: The whiteboard is being created but not yet finalized.
Live: The whiteboard is live and actively being used for collaboration.
Published: The whiteboard has been finalized and made public.
A whiteboard session is considered live when its status is set to Live. This indicates that users are actively collaborating on the whiteboard in real time.
Members: These are individuals who have access to the whiteboard, allowing them to view, edit, and collaborate on the content.
Live Participants: These are members from your organization who are actively participating in a whiteboard session in real-time.
The integrated editor offers tools like Select/Adjust, Sketch, Line, Polyline, Shape, Pan, Zoom, Show/Hide grid, Insert media and more. Please check out our Getting Started with Whiteboards guide for an in depth list of available tools.
You can add multiple views within the Views sub-tab, enabling you to create additional pages in a whiteboard. This feature helps you organize your ideas more effectively by providing separate spaces for different aspects of your project.
You can set the access level to Public for everyone in your organization or members only for specific individuals.