Table of contents
Getting Started with Shipping
Tuesday November 7, 2023-28 min readIntroduction
Managing shipments through multiple carriers and handling paperwork by hand can be time-consuming and case delays. In today’s competitive market, companies need to have better visibility and control over their outgoing shipments. Appward’s shipping app provides a straightforward, all-in-one solution for efficient shipping management. Shipping works with major carriers like FedEx, allowing you to track shipments in real time and improve your shipping strategist, improving customer satisfaction.
Let’s get started
To get to the Shipping app, go to to the Operations section of the main navigation bar and select Shipping.
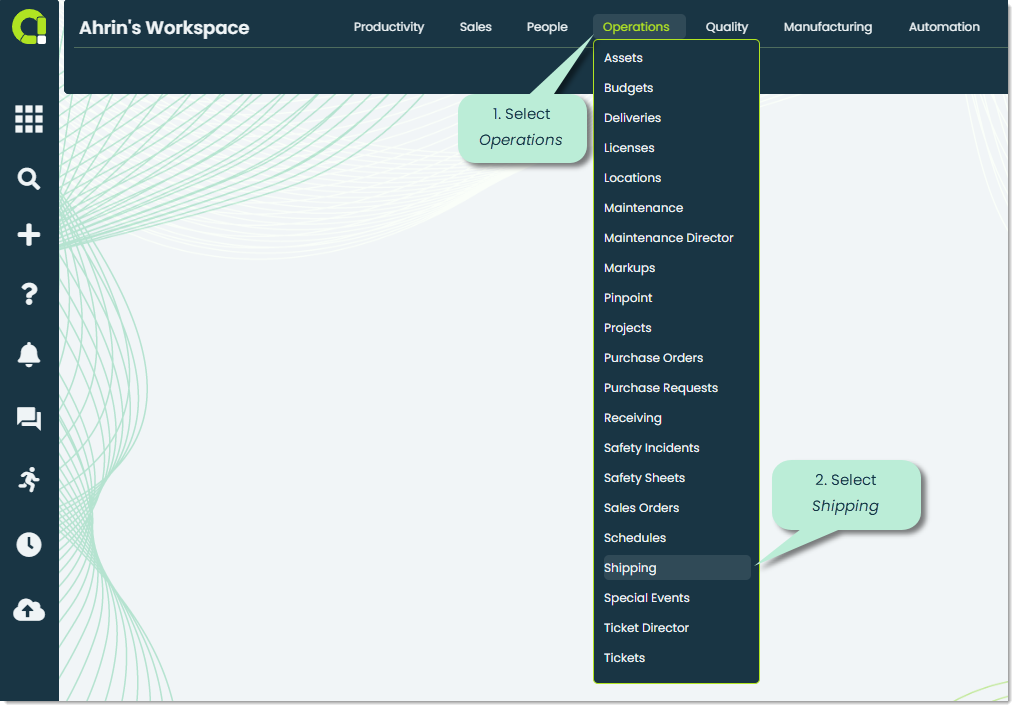
When you first open the app, you’ll be shown the All Shipments tab, which contains all of your organization’s scheduled shipments.
Note: If this is your organization’s first time using this app, this screen will be blank.
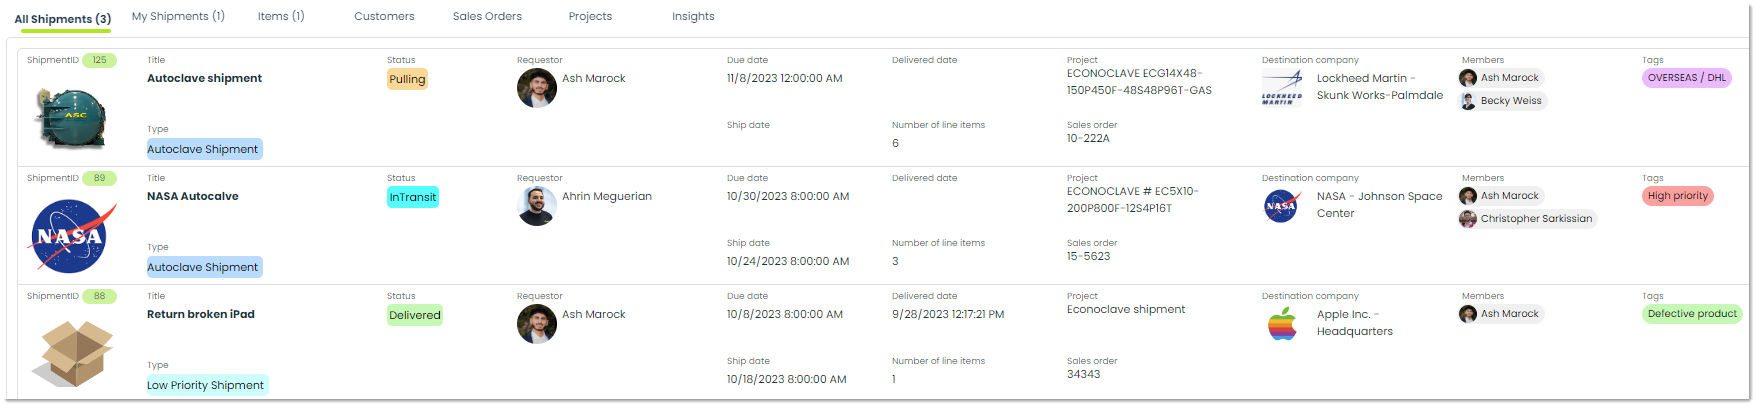
At the top of the app screen, you’ll see seven distinct tabs. Let’s review the purpose of each of these tabs.
All Shipments – In the All Shipments tab you can view all the outgoing shipments in your organization. This view allows you to focus on the shipments leaving your facility, providing you with important information about their status, destination, and transaction history.
My Shipments – You can view all the shipments you have directly requested within the My Shipments tab. It’s just like the All Shipments tab, but it only shows the shipments you’re in charge of, making it simple to keep track of shipments directly related to you.

Items – In the Items tab you can find a comprehensive list of all the items used within your organization’s Shipping app. It lists various items used in your shipping and logistics, making it handy for tracking and managing your inventory and resources.

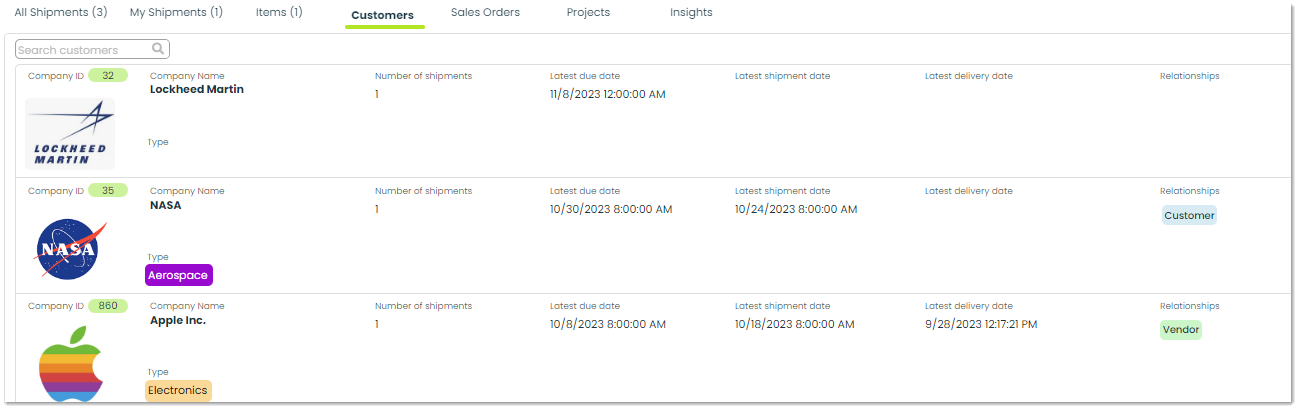
Customers – The Customers tab displays a list of the customers who have received or are scheduled to receive a shipment from your organization. You can also check additional information like shipment frequency, upcoming and latest shipment dates, and a label indicating your organization’s relationship with them.
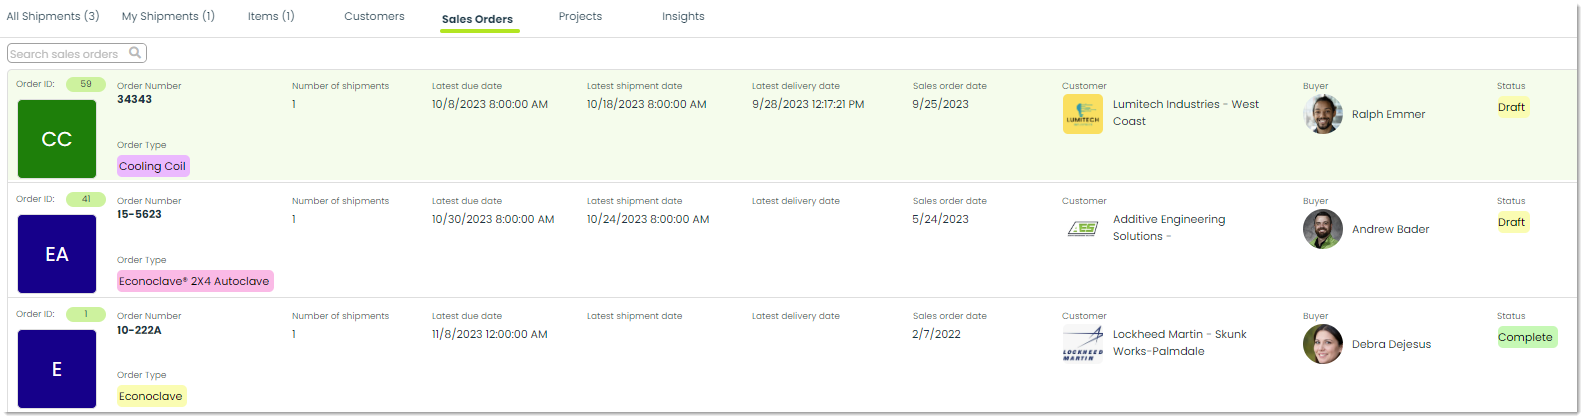
Sales Orders – Sales orders are used to confirm a customer’s request to purchase specific products or services. They serve as legally binding agreements between sellers and buyers, outlining all the necessary details of their transaction. Sales orders are generated by the seller company and issued to a customer. You can import existing sales orders directly from your organizations records within the Sales Orders app.
Projects – The Projects app provides a comprehensive solution by unifying project components, providing a centralized location for up-to-date information, and enabling a smoother workflow for your organization. For more on Projects, please check out Getting Started with Projects.
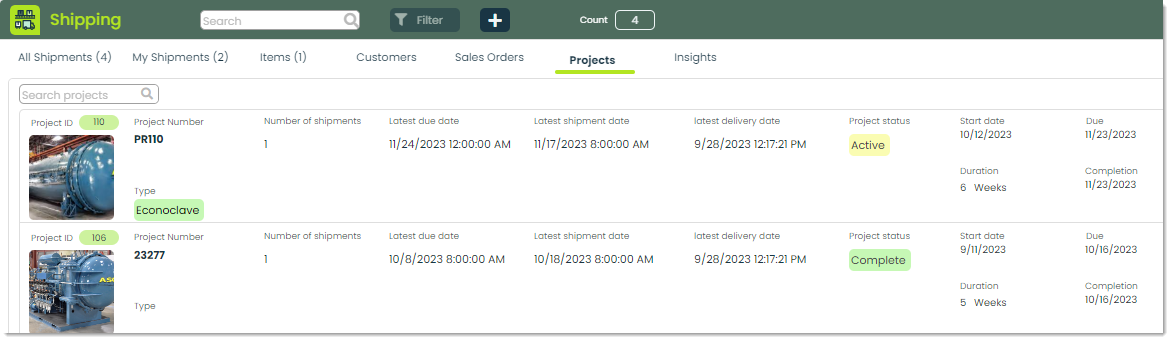
Insights – This tab is used to analyze collected data from your organization’s shipments With Insights, you can uncover valuable information pertaining to shipment frequency, tracking, and even customer requests. For more on Insights, please check out our Getting Started with Insights guide.
How to add a shipment
To add a new shipment, you can click the + icon at the top of the app screen.

Next, you’ll be presented with the Add Shipment popup, giving you the opportunity to input important information regarding a shipment. Let’s go over the fields at your disposal for inputting vital information.
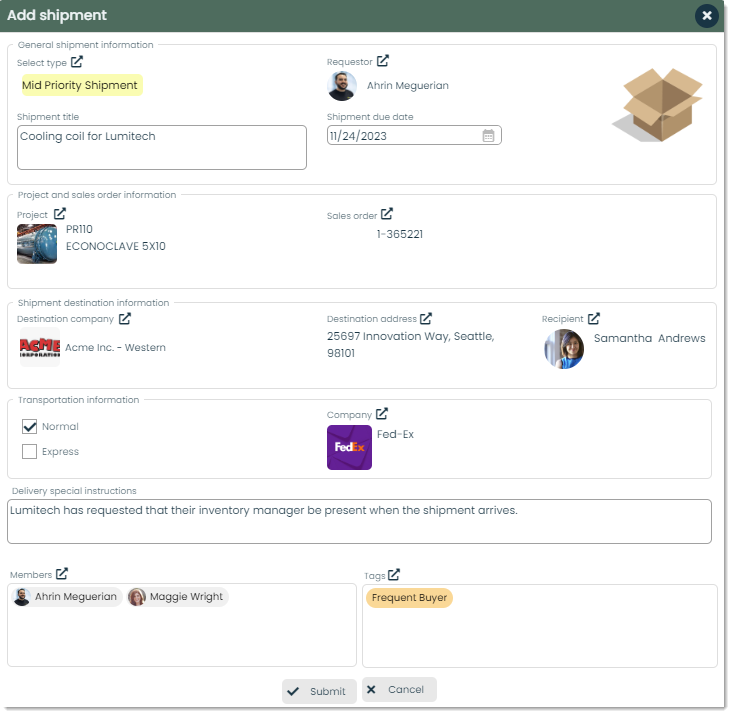
Select Type – You can categorize the shipments you create by the type you assign to them. Types appear as labels with custom names, colors, and images that can be directly associated with records throughout all of Appward. Types provide you with a way to organize your data in a fully flexible, customized way to suit your business. As an example, a change associated with improving safety incident standards might be categorized by the type “Incident Prevention”. For more information on Types, please check out our article Using Types.

Requester – The Requester is the individual from your organization who is responsible for handling the details of the shipping. This role may involve important tasks such as ensuring the goods are transported safely and in a timely manner and communicating with customers.

Shipment Title – This field provides your shipment with a title to help you and your team quickly identify the subject of the shipping record at a quick glance.

Shipment due date – You can designate the date of shipment required by the customer within the Shipment due date field. You have the option to manually enter the date in the text field or utilize the integrated calendar selector by clicking the calendar icon.

Project – Shipments are often linked to projects within an organization. You can specify if there is a project that should be imported into the shipping

Destination company – In Destination company you can select and view the name of the company that is receiving the shipment from your company.

Destination address – The Destination address is the specific location to which a shipment is intended to be delivered. Typically an address will include street address, city, state or province, and postal or ZIP code. You can select from a relevant list of addresses that correspond to the shipment’s destination company.

Recipient – The recipient of the package is the individual designated to receive and handle incoming shipments or packages on behalf of the destination company. This person is usually responsible for ensuring that the received items are process and used as intended.

Shipping speed – Normal shipping and express shipping are two different methods of shipping goods or packages.
1. Normal:
Cost: Normal shipping is typically more cost effective compared to express shipping. This is often the default option for most companies.
Speed: Normal shipping is slower than express shipping, and delivery times are often inaccurate with delays.
Reliability: Normal shipping is generally reliable, however it is more often effected by things such as high traffic or bad weather conditions.
2. Express:
Cost: Express shipping is pricier than standard shipping because it includes a range of additional benefits.
Speed: The main characteristic of express shipping is its speed. Shipments with express shipping will be delivered within a shorter time frame.
Reliability: Having express shipping generally means that a customer expects minimal delays and the guarantee that their shipment will arrive safely and promptly.

Company – This is where you can select the name of the company who is handling the shipping of the product.

Delivery special instructions – Within this category, you have the opportunity to record specific guidelines related to the shipment of your packages. This might include a note to your team about a customer request such as preferred drop off location, or having the package be received by a specific individual in this company.
Members – Members are individuals whom you assign the ability to edit a shipping record. Members play an important role within Appward, as they allow you to provide specific individuals from your organization with access to particular records. Records in your organization can generally be categorized as public, members-only, or private. To select members for a specific shipping record, simply click the external link icon and select from a list of organizational contacts.

Tags – Visually, tags are labels with customized font and background colors. They are used throughout Appward to provide better organization and searchability of your organization’s projects. Furthermore, tags offer additional context to individuals within your organization, enabling them to gain insights into the content of a record before they even access it. For more on tags, please check out Using Tags.

How to view and manage shipments
Once a shipping record is added, you have the option to access it in two distinct ways. The All Shipments tab presents a comprehensive list of all shipments within your organization. Conversely, the My Shipments tab exclusively shows the shipments for which you are the requester.

You can view the details of a shipment by clicking on the row of the record you wish to view.
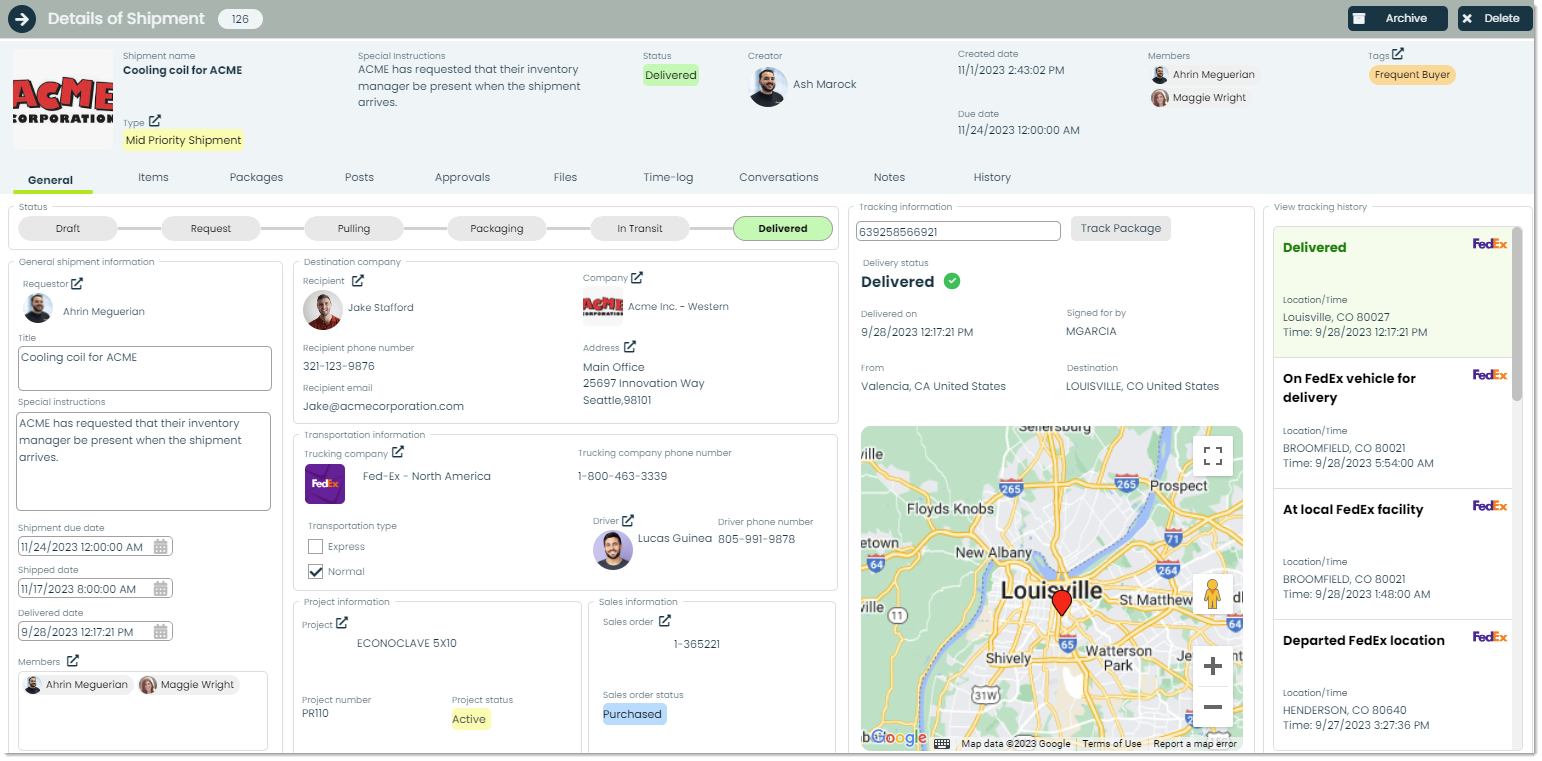
Next, you will be presented with a details flyout, where essential information related to a shipment is highlighted. Let’s go over the unfamiliar fields, what they mean and how you can manage them.
Status – You can view and edit the current stage of a shipment by selecting the corresponding field in Status.
Draft: In the Draft stage, the shipment is currently in the planning phase.
Request: The Request stage signifies that the shipment’s plans have been submitted and the shipment is ready to go. The stage is initiated when a customer requests us to ship an item, whether it’s for purchases, returns, or any other purpose.
Pulling: Once the items are ready to include into a shipment package, you have the option to switch the stage to Pulling. This stage indicates that the items are ready to be removed from inventory to be added to the shipment.
Packaging: After the items have been pulled from inventory, they are now ready to be packaged.
In Transit: During the In Transit stage, the shipment is on its way to the designated destination.
Delivered: When a shipment is complete, it will be in the Delivered stage. This means that the shipment has reached it’s destination and has been successfully delivered.

Requester – You can specify the individual responsible for requesting the shipment within the Requester field. The requester is the person who submits
a request to ship a part to a vendor or customer as an outbound shipment request. You can define the Requester by clicking on the external link icon and selecting the person from a list of available contacts.

Title – This is where you can provide a concise title or description of the shipment, such as an order or package name.

Delivered on – The Delivered on field is used to specify the date on which the shipment was successfully delivered to its destination.

Company – In this field, you can input the name of the company or business associated with the shipment or delivery. You can select the external link icon within the Company field to select the desired company from your organization’s list.

Address – This field is for the delivery address, where you would input the physical location where the shipment or package was sent or received. It typically includes the street address, city, state, and postal code.

Trucking company – Defining a reliable trucking company is essential to ensuring that your shipment reaches it’s destination in a quick and safe manner. Trucking companies can be selected from a list of companies your organization has defined internally. For the purposes of this guide, we will refer to FedEx as the Trucking company.

Trucking company phone number – The Trucking company phone number field is where you can view the phone number of the Trucking company.

Driver – This is where you can view the driver’s name, or assign a new driver to the shipment.

Driver phone number – This is where the driver’s phone number can be viewed, which is important to have access to especially during the course of a problem or urgent emergency.

Project – You can click the external link icon to bring up a list of projects within your organization. This is especially helpful when trying to specify that a shipment is directly related to a project. For more on Projects, please check out Getting Started with Projects.

Sales order – Just like with projects, you have the option to associate sales orders with your shipments to enhance the context and precision in your shipment records. To learn more about working with Sales Orders, refer to the Getting Started with Sales Orders guide.

Tracking number – Tracking numbers represent distinct alphanumeric identifiers allocated to shipments by shipping companies. These numbers serve as references, enabling the seamless tracking of a package’s voyage from the time it is put together, as it’s prepared for transit, all the way to its final delivery at its designated destination. Appward makes effective use of the FedEx API to integrate FedEx shipping and tracking functionalities directly into the Shipping app. This allows for you to track the status and location of packages in real-time.
By using the tracking number, you gain access to a wealth of additional information about your shipments. Let’s go over what you get access to.
Delivery status – Delivery status refers to the current condition or state of a shipment at the current point in its journey. It indicates whether a package is out for delivery, delayed, or already delivered.

Signed for by – Signed for by indicates the individual who was responsible for accepting the package.

From –In From, you have the ability to access information regarding the origin point of the package’s shipment. The information is provided in a structured format including City, State, and Country.

Destination – Destination is the location where the package is going to.

Tracking History – The Tracking History section displays a comprehensive log of updates related to the journey of a shipment from start to finish. The history includes essential details such as the sender’s location, transit checkpoints, estimated delivery times, and the final confirmation of delivery to the recipient.
How to pull items
To retrieve items from the inventory, navigate to the Items tab located within the details flyout of a record. Let’s go over the process for pulling items from your organization’s inventory to get them ready for packaging.

New item – To add a new item to the list of parts within a shipping record, you can press the New item button.

After pressing New item, you will be presented a popup titled Add item where you can select a part from your organization’s list of parts. For more on parts, please check out Getting Started with Parts.

Browse items – In Browse items you can view a comprehensive list of items that are ready to be shipped instantly.

Pull request – A pull request refers to the request made by someone in your organization for fulfilling customer orders.

Pull items – You can select items from your organizations inventory by selecting Pull items. This will tell everyone in your organization that you require a certain number of items.

Package items – To package an item, you must first select the checkbox corresponding to the item you wish to package. After selecting the item, press Package to be prompted by the Package Item popup.
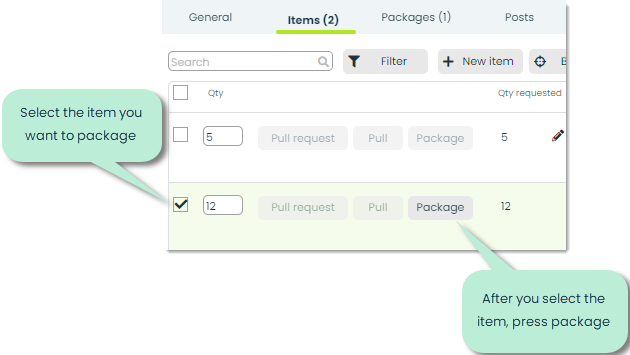
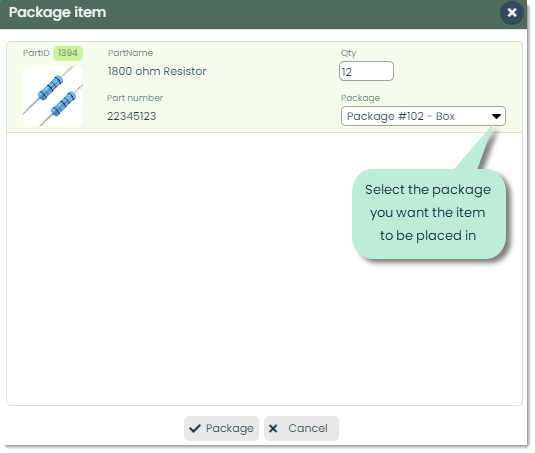
In the Package item popup, you can select the package you wish to add the items to.
How to add a package
To view your organization’s existing packages or add a new package, navigate to the Packages tab.

Press the +Package button to add a new package.
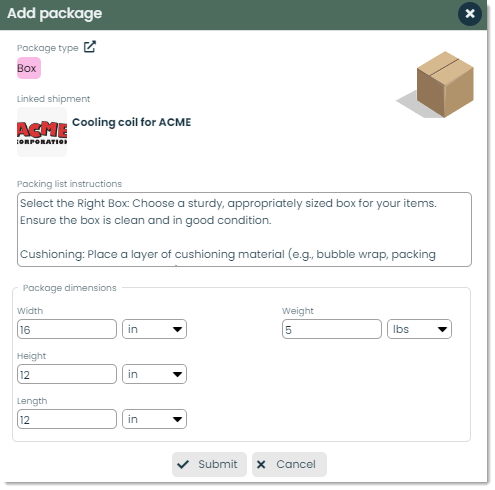
Package type –You can categorize the shipment you create by the type you select. Visually, types are labels with custom names, colors, and images that can be assigned to records throughout Appward. However, types provide you with a way to organize your data in a fully flexible, customized way to suit your business. As an example, a shipment packaged inside of a box could be labeled with the package type of Box. For more on types, please check out Using Types.

Linked shipment – In Linked shipment, you can view the shipment the package is directly related to. It helps you establish a connection between the current record and a specific package which helps manage the entire process more effectively.

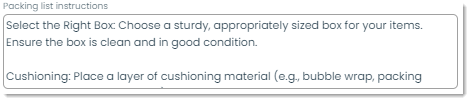
Packing list instructions – This field is used to provide instructions or details regarding the packaging of items in a shipment. It may include information about how items should be packed, labeled, or organized for shipping.
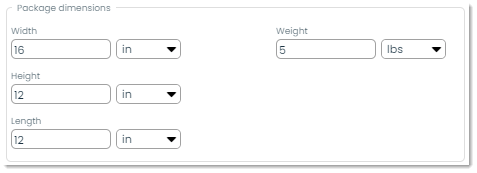
Package dimensions – This set of fields pertains to the measurements of the package that is part of the shipment.
Width: The horizontal measurement, from side to side.
Height: The vertical measurement, from top to bottom.
Length: Measurement of the package from the front to the back.
Weight: This field indicates the weight of the package, measured in pounds, kilograms, or grams.
How to add Approvals
An approval is a formal authorization or permission granted by a person or group of people to proceed with a specific action, request or decision.
To add an Approval to your project, navigate to the Approvals tab and press the + icon.
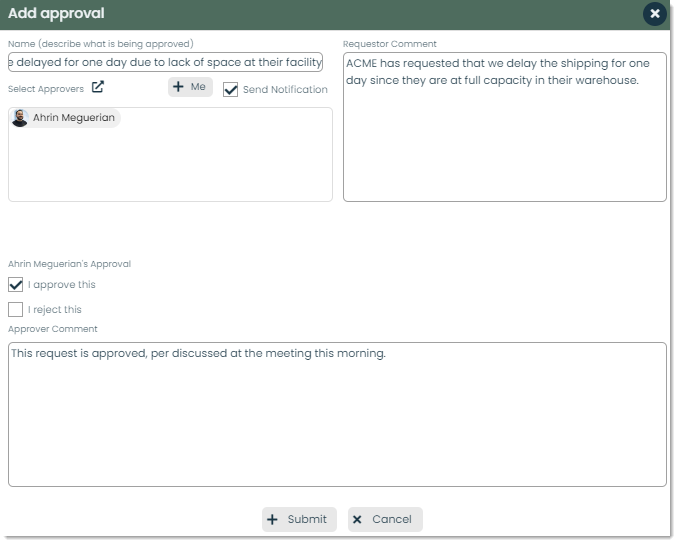
You will then be shown the Add approval popup, where you can input all the necessary details of your approval. Let’s cover the fields available.
Name – You can assign a Name or title to your approval request in this section. The name should be concise and provide a quick overview of the request, allowing the topic to be easily identified at a glance.

Approvers – Within Appward, those who have the responsibility of approving or rejecting approval requests are known as Approvers. To designate approvers, simply click the icon in the Select Approvers
section, which will bring up a list of selectable contacts for you to choose from. If you want to assign yourself as the Approver you can easily do so by pressing the + Me button.

Send Notification – You can send the approver(s) a notifcation by marking the checkbox in the Send Notification field. This will trigger a notification to appear in the approver’s notifications tab in their workspace.

Requester Comment – The individual who is creating the request has the ability to add additional context within a comment in the Requester Comment field.
Your Approval – If you are the approver, you will be shown additional options in the popup. Options to approve or reject the approval request will be available to you.

Approver Comment – After approving or rejecting the approval request, you can provide a comment in the Approver Comment field to explain why a specific decision was made.

Frontline Features of Shipping
Posts – In Appward, a post is a comment that can be liked or replied to directly by other members of your organization. Within Shipping, a common way of using posts is to write to parties associated with the shipping to make changes in a step.

Files – Through the Files tab, you can attach essential documents to a shipping record. You can add files directly from your computer or from the Appward cloud. After adding a file, you can view it through an integrated document preview within the
Files section. Individuals within your organization with access to the record can download the file to their personal computers.

Timelog – Within Timelog, you have access to a built in timer designed for tracking the duration of activities associated with shipment. This timer offers Start, Pause, and Stop buttons, allowing you to manage its state to accurately log the time spent on individual tasks.

Conversations – Within the Appward platform, users have the flexibility to include conversations in one of four distinctive styles. These four conversation styles encompass email, meetup (for scheduling meetings), phone call, and video call. The choice of style determines the specific set of fields that will be available for input. For instance, when opting for an email-style conversation, fields such as CC (carbon copy) and BCC (blind carbon copy) are included, as they are common features in email communication. For more information, please check out Getting Started with Conversations.

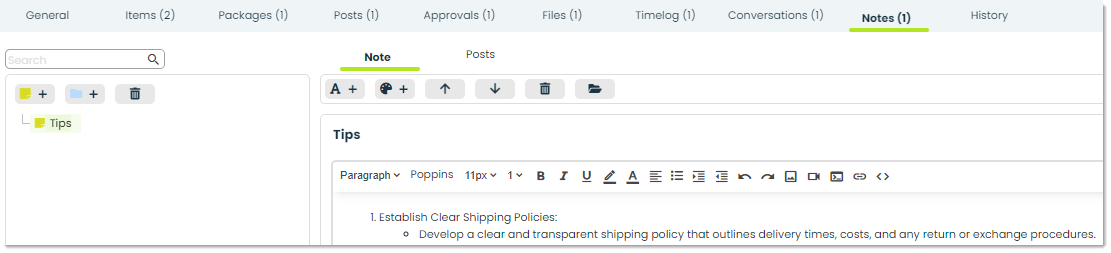
Notes – Within the Notes tab you can write, save, and share written records that help capture and convey your thoughts. You’ll be able to stay organized, provide better context to changes, and improve communication between you and your team.
History – In History, you can view an activity log related to the shipping record you are viewing. You will see a list displaying the change date, activity description, change author, and the application in which it was made.
