Table of contents
Getting Started with Work Order Director
Friday October 27, 2023-45 min readWhat is a work order?
In manufacturing, a work order is a document that serves as an instruction for the production or assembly of a specific product. It is an essential part of the manufacturing process, helping to ensure that production tasks are completed efficiently and accurately. Work orders are typically created by production or operations managers and include details about the product to be manufactured, the materials required, the steps involved in the production process, the workers assigned to complete the order and any other relevant information.
Here are some key components of a work order:
- Product information: This includes details about the product to be made such as its name, part number, description, associated project and quantity to be manufactured.
- Work instructions: These are detailed, step-by-step instructions that outline the manufacturing process including equipment to be used, assembly steps, quality control checks and safety guidelines.
- Bill of materials (BOM): This is a list of all the components and materials required to assemble the product, along with their quantities, specifications and any drawings if applicable.
- Labor estimates, assignments and allocations: This is information about the labor needed for the production process, including the projected cost and hours of work, names of workers or teams responsible for various tasks and actual time spent working.
- Production schedule: This is the timeline for completing the work order including start and end dates of the different tasks.
- Quality control measures: These are any specific quality control checks, inspections or tests that need to be conducted during or after production.
Work orders are like to-do lists for a manufacturing team. They help everyone involved, from the boss to the workers, by making sure tasks are organized, assigned and done on time. Good work orders help you gather, share and use information that can be used as templates for future work orders.
Introduction
Work Order Director is a companion app to Work Orders. While your production team uses Work Orders to tackle their assigned tasks, think of Work Order Director as the app for overseeing and streamlining the whole process. This guide will cover everything you need to know from creating work orders to adding individual steps and releasing them to your workforce to get work done.
Let’s get started
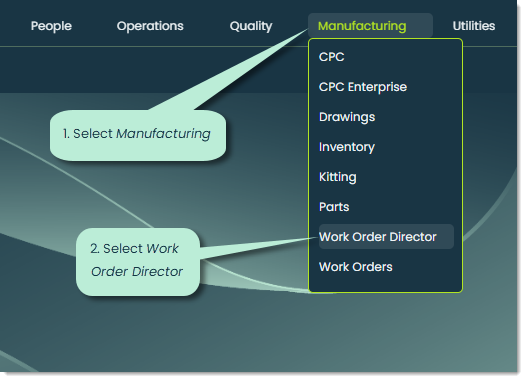
To open Work Order Director, go to the Manufacturing category of the main navigation bar and select Work Order Director.
When you open the app, you’ll see a list of work orders ordered by stage with earlier-stage work orders appearing first.

Let’s go over each tab:
1. Work Orders – This is the default tab when opening the app. It contains a list of the root-level work orders that have been created. This implies that more complex work orders can consist of sub-work orders, forming trees of work orders within work orders each consisting of their own sets of steps. You’ll notice a checkbox for Show Sub-Work Orders on this page. To view every work order, whether it is a root or sub-work order, check this box.
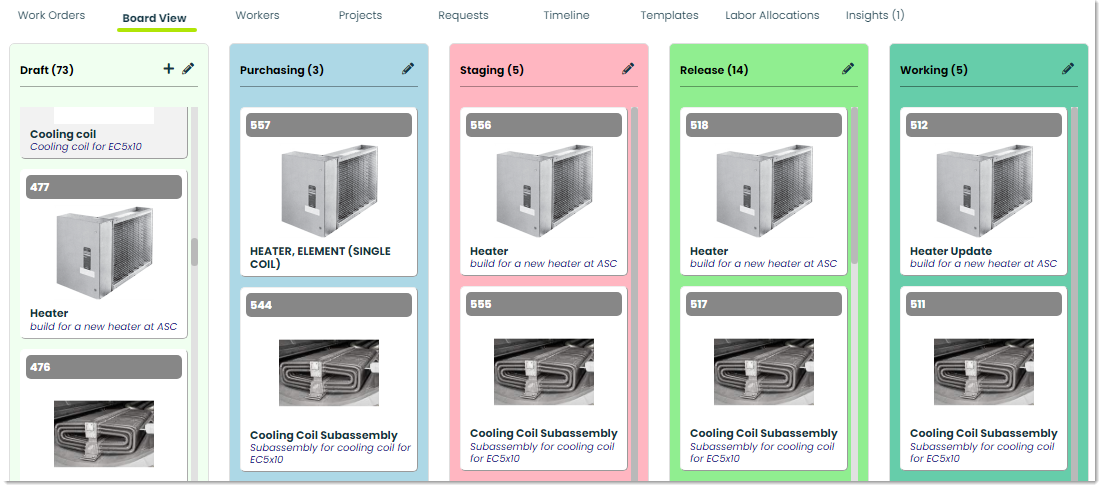
2. Board View – This tab shows a Kanban-style display of work orders grouped by their current stage. For example, all work orders in the Purchasing stage will appear in the Purchasing column with their own movable, editable cards. This provides a nice visualization of the work order life-cycle within your organization and gives you the option of changing the stage of a work order by dragging and dropping it into different columns. We’ll cover the different work order stages in a bit.
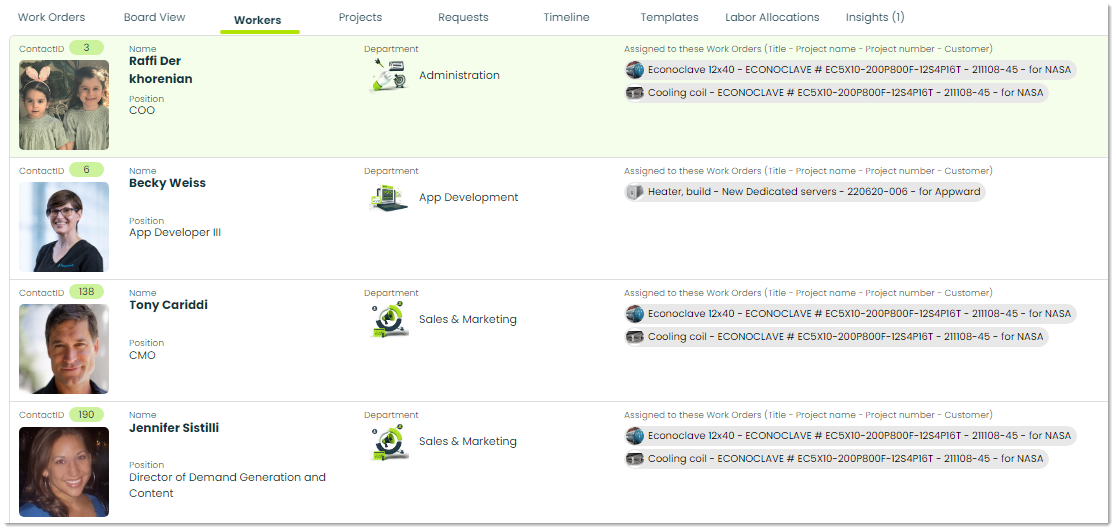
3. Workers – This tab displays every worker that is currently assigned to a work order, along with the work order or work orders that they are assigned to. By clicking on a worker, you can track their labor metrics which include labor allocations (their logged hours of completed work) and assignments (the work orders that they have been assigned to).
4. Projects – This tab displays all projects from the Projects app which are linked to work orders. Compared to a work order, a project is a broader and more complex endeavor consisting of multiple tasks, phases and resources. Projects and work orders are closely intertwined, but projects are different in that they can consist of multiple work orders while work orders are only linked to one project at a time. Appward provides an intuitive system of creating a project in the Projects app and then linking that project to a work order in Work Order Director. We’ll cover how to do this when we add a new work order.

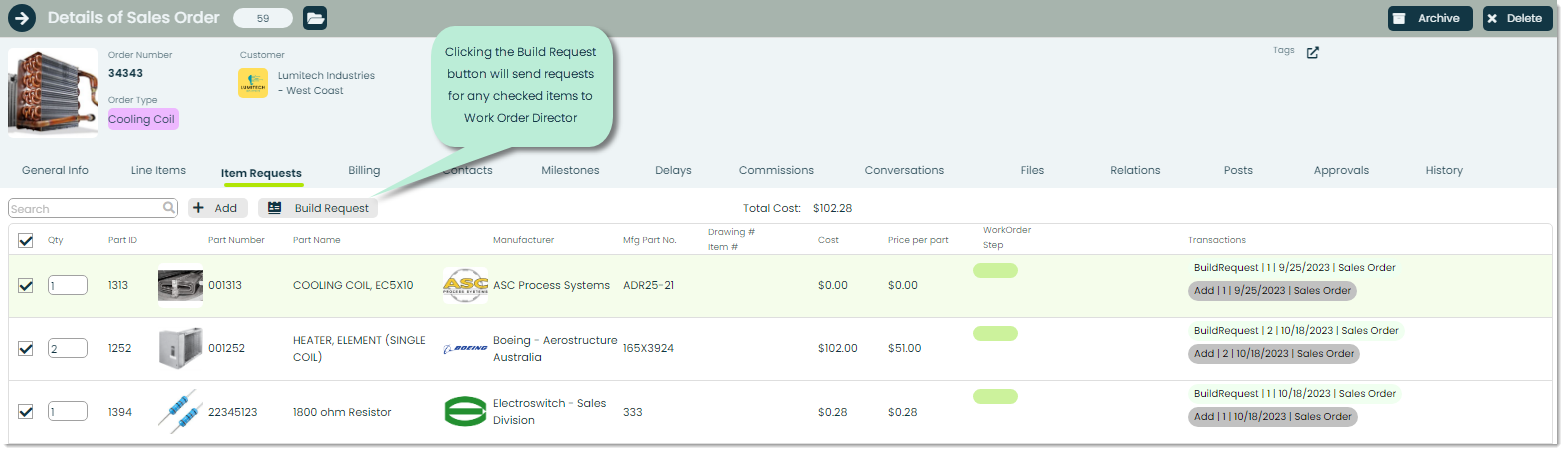
5. Requests – Work orders can be initiated by requests from other applications to build something. These are known as build requests. Say, for example, you are processing a sales order and need an item or multiple items which can’t simply be taken from inventory but must be built first. You can go into the Item Requests tab of that sales order, add the items from your Parts app by clicking Add, select them from the list of items and click the Build Request button. This will send build requests for each different kind of part to the Requests tab of Work Order Director. Here is an example from a sales order in the Sales Orders app.
The Requests tab of Work Order Director displays all build requests from other applications. Each record consists of the part requested for build, the option to create a work order from the request, the originating app/app record and the most recent transaction. If a work order has been made from the request, you’re able to jump to it directly from this tab.
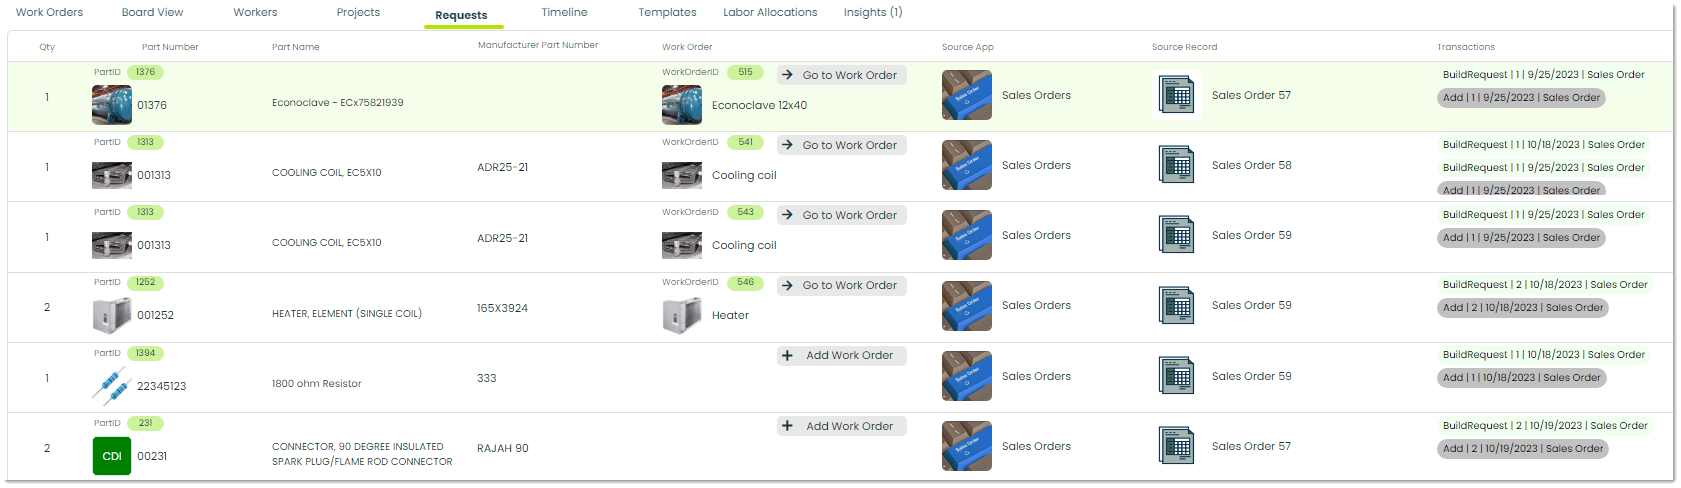
Build requests can come from two applications: Sales Orders and Inventory.
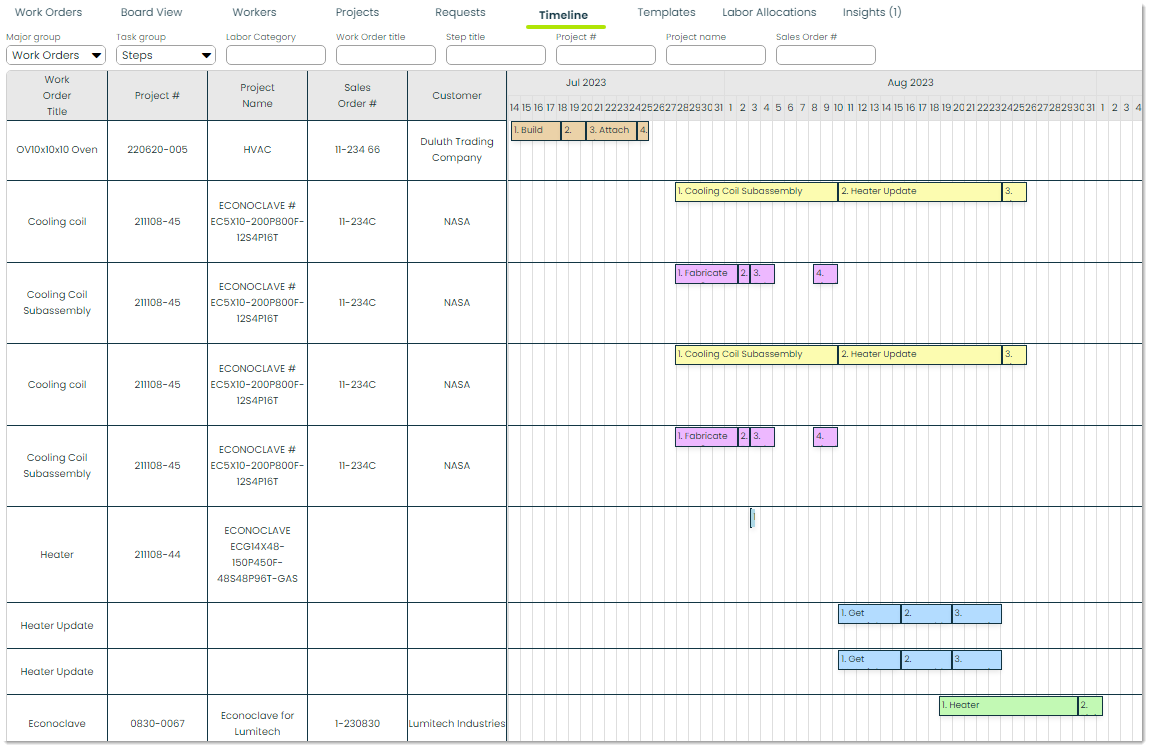
6. Timeline – This tab displays timelines of various work order-related information. You can select the major group you’d like to view such as Projects, Sales Orders, Work Orders or Labor.
7. Templates – This tab contains all existing work order templates. A template is a blueprint of a work order (usually based off an actual work order record) which can be used to quickly and easily create similar work orders. With a template, you can grab all of the steps, instructions, materials and other work order information and make minor changes to save a lot of time and create a standardized process for conducting similar work.
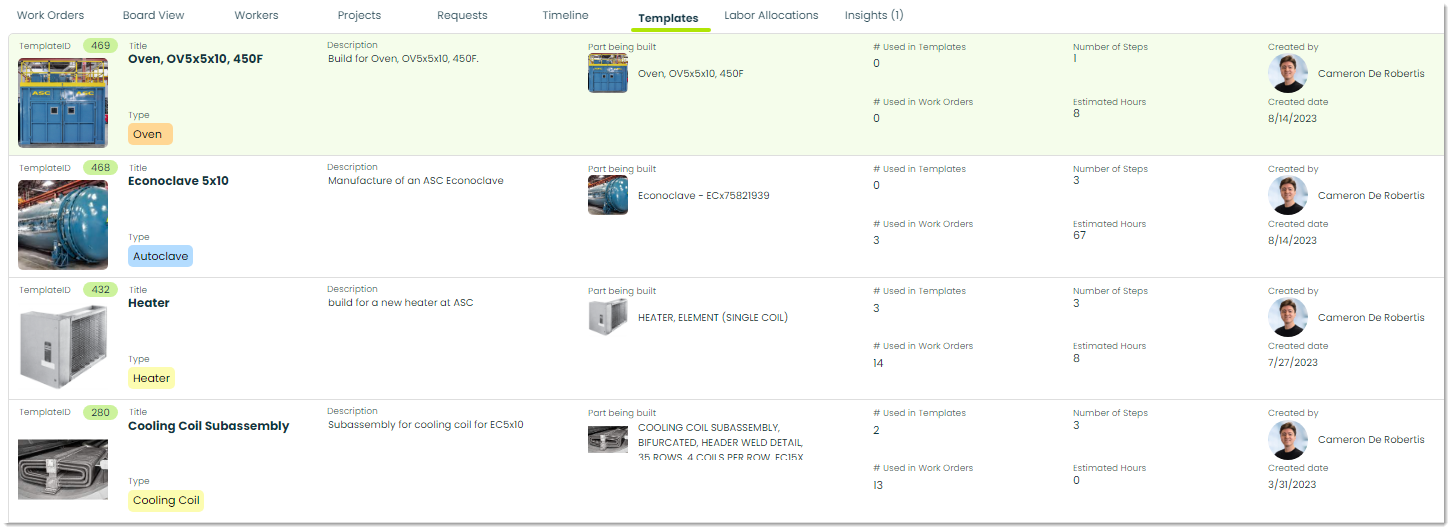
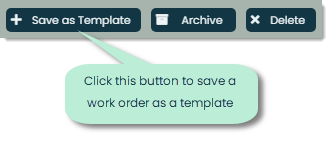
To save a work order as a template, go into the details of any work order and click the + Save as Template button found in the top right corner of the screen.
Important note: Even though templates are blueprints for other templates, at the core, they are just work orders that have been labeled as templates.
8. Labor Allocations – This tab shows all the details about labor allocations which is the actual work done on work orders, such as the hours worked, the worker’s pay rate and the total cost of their work.
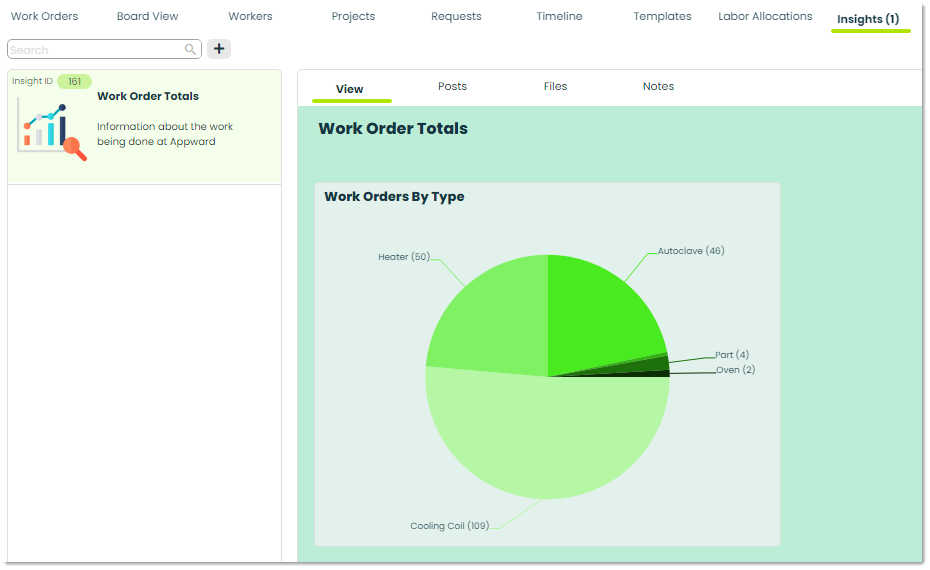
9. Insights – Insights give you a visual way to analyze data for work orders. You can make your own insights with custom SQL queries and use charts or tables to display the data. Some useful insights for Work Order Director might include information about work order status, worker performance, or cost analysis.
How to add a new work order
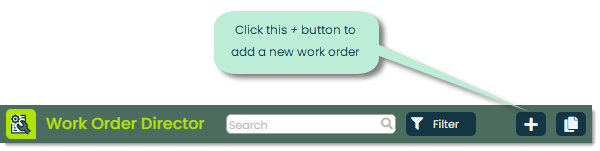
From the Work Orders tab, click the + button at the top of the screen to start creating a new work order.
You can either create a work order from scratch or use a template. For now, we’ll assume that this is your first work order and check the Create new box. From here, you can start adding all the details of the work order.

Let’s break down the process and check the information needed at each phase.
Phase 1: General Details
Type – A type is a label consisting of a key phrase and a color which can be assigned to a record to define the primary category that it belongs to. Just like sorting your emails into folders, types help you group items in a logical, organized way that makes sense your business. For Work Orders/Work Order Director, this could be by the item getting manufactured, the industry for which the work order is being done or whatever your organization sees fit. Unlike tags which could change, Work Order Types provide a permanent way to classify and understand your work orders, helping you maintain a structured and organized workflow. For more on types, make sure to check out our article on Using Types.

Title – The title is like a short and clear name for each job. It’s the way we quickly understand what work needs to be done or what item needs to be made. For instance, it might say Model F1234 Refrigerator Compressor Assembly or Part S789 Aluminum Frame Fabrication for Solar Panels. This title helps everyone in the team know what the work order is all about and keeps everything organized and easy to find.

Description – This is where you can provide detailed information about the job or task at hand. It’s like a short story that tells the who, what, when, where and why of the work to be done. This field allows you to explain the work’s purpose, scope and any special instructions or requirements. A well-written description helps everyone involved in the work order understand what’s expected and how to carry it out effectively.

Quantity – With this field you can indicate the quantity of the item to be manufactured.
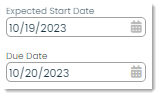
Start/Due date – These values signify when the work order starts and when its deadline is.
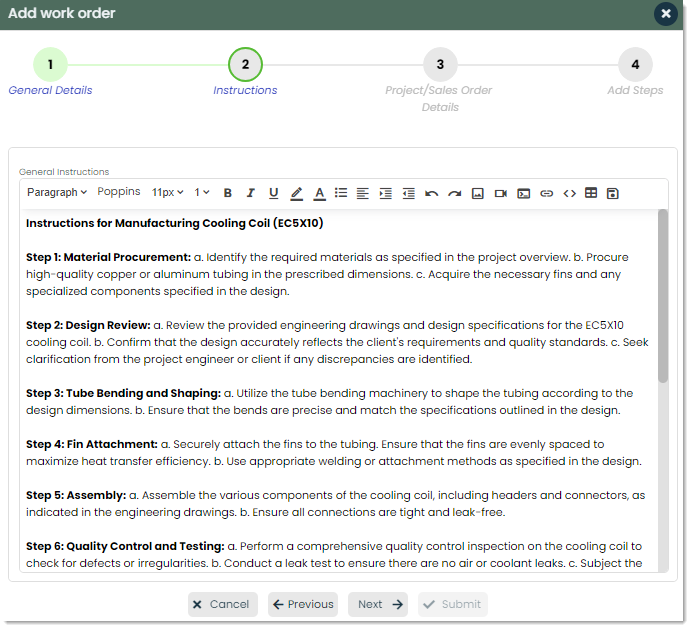
Phase 2: Instructions
The Instructions phase is where you would enter the main instructions for the work order. It is a set of clear, step-by-step directions for the job and is where you tell everyone exactly what needs to be done. Think of it as your recipe for completing the task. These general instructions are vital for making sure everyone follows the right process.
Phase 3: Project/Sales Order Details
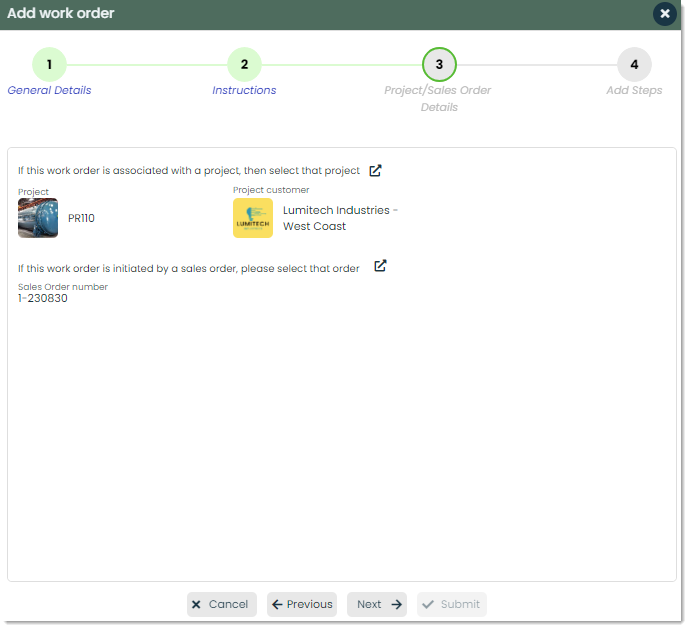
If needed, this is where you connect the work order to a project or sales order. You can pick the project from your records in Projects and/or the sales order from your records in Sales Orders. It’s like saying, “This work is part of this project or for this customer’s order.” It helps keep things organized and connected.
Phase 4: Add Steps
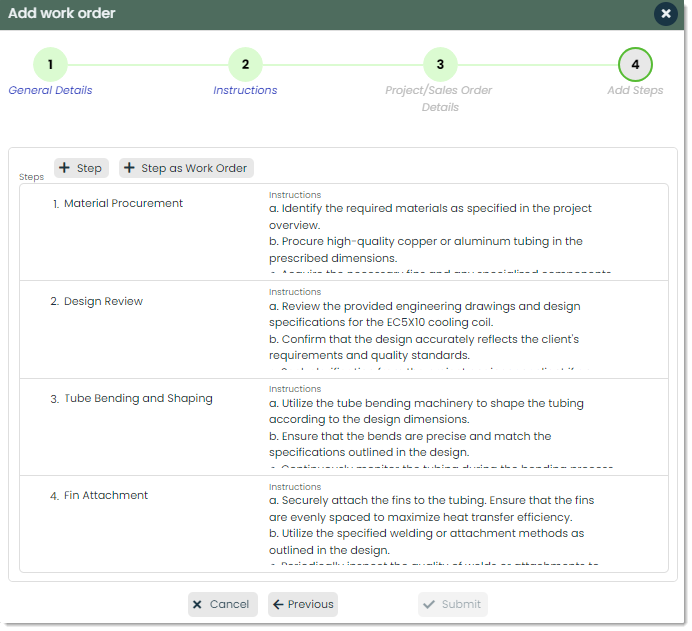
This stage is where you would add the different steps of the work order. These are the individual tasks to be completed for the order. One thing you’ll notice is that you can either add a new step or add a new step as a work order. This is an important distinction as it implies that work orders can consist of sub-work orders. Depending on the complexity of work, work orders may be nested within other work orders. And those sub-work orders can have work orders nested within them!
Let’s go through the components of a regular step, then we’ll add a step as a work order to see the difference. To add a regular step, click the + Step button. This will open a separate popup for adding the step’s information.
General Details
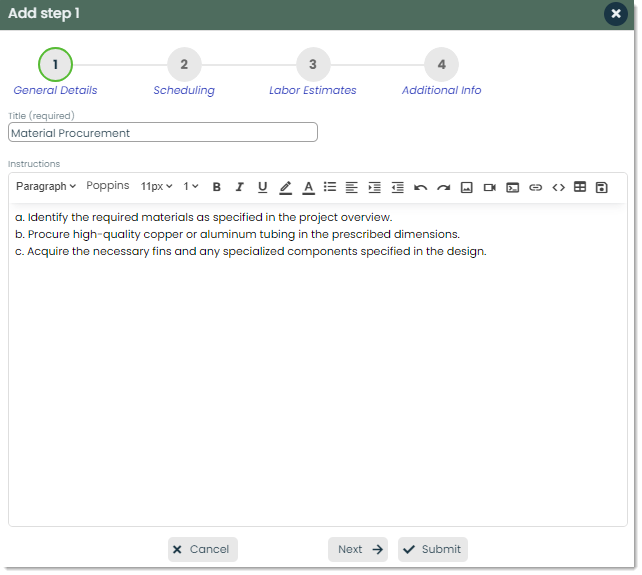
Here, you would indicate the title of the step as well as its instructions. This is different from the general instructions of the work order. General instructions in a work order are like the big picture that give you a general idea of what the whole job is about. On the other hand, individual step instructions are like a detailed road map for each small part of the job. They help the designated workers do each step correctly. You need both to get the job done right.
Scheduling
This section is for identifying when the step is to be completed.

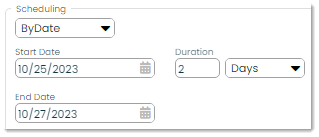
For the first step added to a work order, you can schedule it by date or by offset.

Scheduling by date means picking the exact start and/or end dates for your step. To choose the start date, click the calendar icon in the Start Date field. If you know the end date, do the same in the End Date field. If not, just enter how long it will take and the End Date will figure itself out.
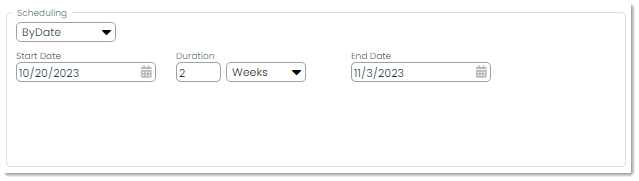
Scheduling by offset means picking an amount of time, or an offset, from the start date of the overall work order and starting the step at that point. You can decide how many days or weeks after the work order begins that you want a step to start. Then, just say how long it takes and the start and end dates will work themselves out. It’s like setting a timer for your step.

Important note: After adding your first step, any additional steps can be scheduled by a third choice which is by step.
Scheduling by step means that you can schedule the time frame of the step relative to another step.

First, choose a predecessor which is the step that the current step will be in reference to. Then, select the relation of the step to the predecessor. The relation can be one of three options:
- FS (Finish/Start) – This will position the current step to start at the end of the predecessor step.
- SS (Start/Start) – This will position the current step to start at the same start date of the predecessor step.
- FF (Finish/Finish) – This will position the current step to finish at the same end date of the predecessor step.
You can choose an offset to delay the step by an additional amount of days or weeks. Finally, choose the duration of the step.
Labor Estimates
In this section you are adding the different labor estimates for the step. This includes the category of labor required for the job, the amount of work in time that is required and the worker’s pay rate.

To add a new estimate, click the + button next to Labor Estimates. This will open a screen for adding the estimate details.

The labor category comes from a position within the Positions app. Click on the external link icon next to Select Labor Category to select which position will be needed to complete the step. You can adjust the rate per hour that the labor will cost as well as the estimated hours.
Additional Info
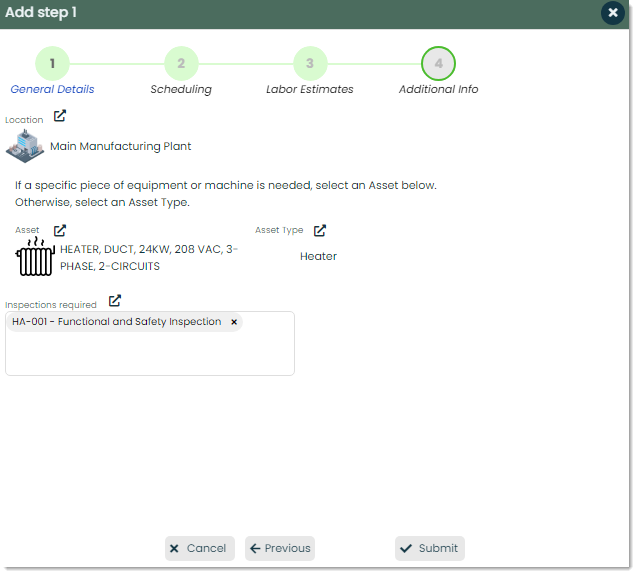
In this section, you can provide extra details like where the work will happen, whether an asset such as a piece of equipment will be needed, what type of asset it is and if there’s any inspection needed, specify what kind of inspection it is.
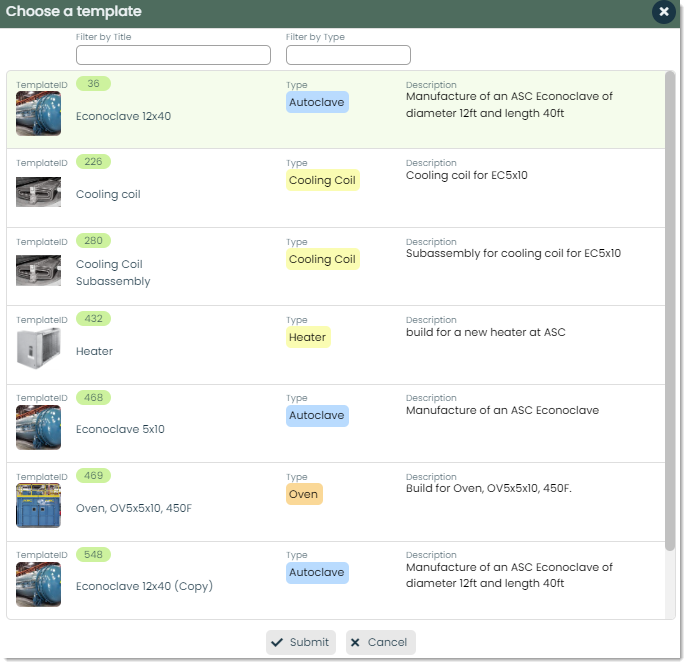
Now that we’ve gone over adding a regular step, let’s see what adding a step as a work order looks like. Important note: To add a step as a work order, you first need to make a template for it.
From the Add Steps phase, click + Step as Work Order to begin this process.

This will open a popup for selecting an existing work order template.
After selecting a template, you’ll see a similar popup to the one for adding a regular step with some slight differences. First off, in the General Details section, the title and instructions will get pre-populated with the general title and instructions from the work order template.

In the Scheduling section, you are positioning the sub-work order in the same fashion as positioning a regular step.

In this section, you won’t see Labor Estimates because, even though you’re adding a step, what you’re actually doing is adding a work order. Therefore, any labor estimates should be put in the regular steps of this sub-work order. It’s like a step within a step!
Finally, the Additional Info section is mostly the same as for a regular step except for the location. Again, this is because information like this would go into a step of this sub-work order. You can combine as many regular steps and steps as work orders to form your work order.
Once you are done, click Submit at the bottom of the main Add work order popup to create the work order.
How to view and edit the contents of a work order
Once you have created a work order, you can view its contents by clicking on it from the main list. You can quickly change information in a work order by editing the information in the text boxes or using the external link icons to select new data. Thanks to Appward’s automatic saving, your changes are saved instantly.
Let’s go through each tab of this flyout and explore the different, modifiable information of a work order.
General tab
By default, the flyout will open to the General tab. A lot of the information on this screen comes from information added in the add process of the previous section. Let’s take a closer look at the extra information on this page.

Here are the different stages and what they mean:
- Draft – This is the initial stage where a work order is created as a preliminary document. It includes basic information about the work to be done but may not yet be finalized.
- Purchasing – In this stage, any materials, parts or equipment required for the work order are identified and ordered. It involves procurement and ensuring that all necessary supplies are available for the job.
- Staging – Staging involves gathering and organizing all the necessary resources, tools and materials in a designated area, often near the work site, to ensure they are ready for use when the work begins.
- Release – This stage involves authorizing the work order to move forward. It may include assigning personnel, scheduling a start date and giving the green light to proceed with the work. When a work order reaches this stage, it becomes visible in Work Orders to all the assigned workers.
- Working – The working stage is for when the actual labor starts. This can be triggered by a worker using the Work Orders app once work has been started.
- Inspection – After the work is completed, there is typically an inspection stage to ensure that the work meets the required quality standards and specifications. This may involve checks, tests or evaluations.
- Complete – In the final stage, the work order is marked as complete. This includes documenting the work done, confirming that it meets the requirements and closing out the order, often with the necessary approvals and signatures.
To change the stage of a work order, simply click on the stage from the progress bar. A popup will appear with the option for you to propagate that change to all child work orders.
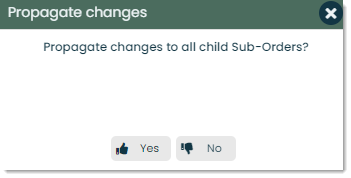
If you choose Yes, not only will the main work order change its stage, but all its linked sub-orders will also switch to the same stage you picked. If you select No, then only the original work order you wanted to change will switch its stage, and the child sub-orders will remain in their current stages.
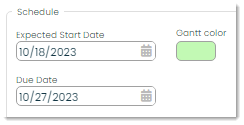
Schedule – The start and end dates of the work order are set when it’s first created. We’ve also added a Gantt color option, which lets you choose a color for this work order in when it is displayed in the Schedules tab Gantt chard. Just click the colored shape under Gantt color to pick the color you want. More on the Schedules tab in a bit.
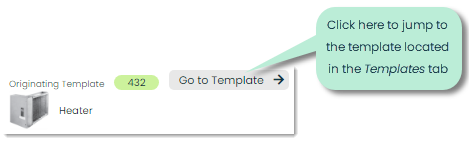
Originating Template – As mentioned earlier, you can use templates to make work orders faster and in a consistent way. If you’ve created a work order from a template, you’ll find the original template info in the Originating Template field. It shows the template’s ID and the part it is linked to. You can jump directly to the original template by clicking the Go to Template button. This will take you to the template record in the main Templates tab.
Steps tab
This tab shows you all the steps in a work order, including time and labor estimates as well as how far along each one is.
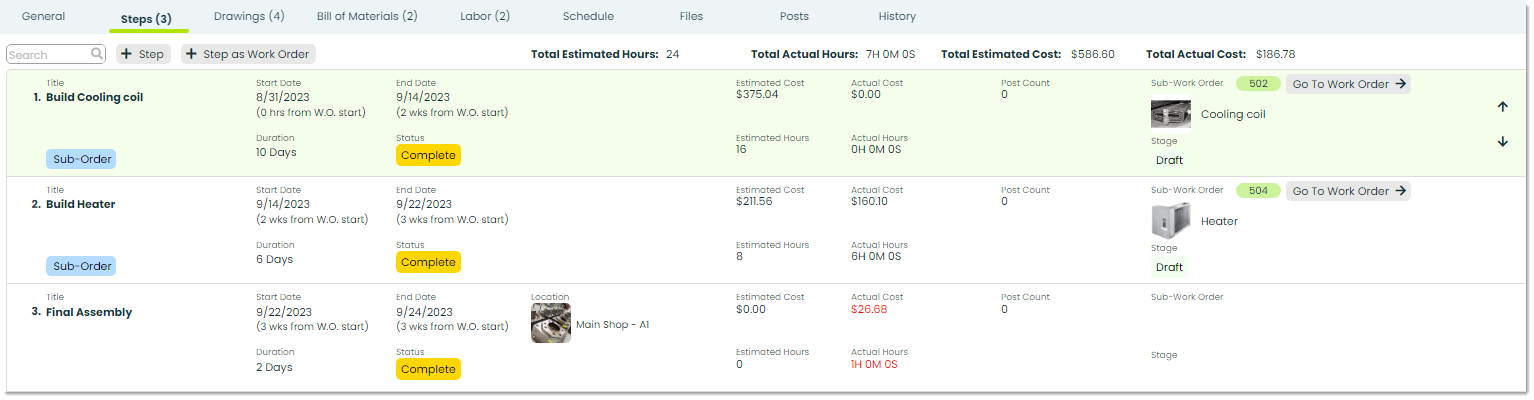
You can view and modify the steps of any work order by going into that work order’s details and clicking the Steps tab. You’ll see all the steps in sequential order with their current statuses, cost and time estimates and actual costs and times spent.
To add a regular step, click the + Step button. If you want to add a step as a work order, click the + Step as Work Order button. If you need a refresher on these processes, please refer to the section on How to add a new work order.

To change the order of steps, hover over a step from the main list and click the up arrow to move it up (earlier) or the down arrow to move it down (later).

The next section will cover how to view and edit the details of individual steps.
Drawings tab
This tab displays an aggregated list of all technical drawings from the work order’s steps as well as the steps where the drawings are used. Drawings could include assembly instructions, wiring diagrams, dimensions of materials or any other important visual aid.
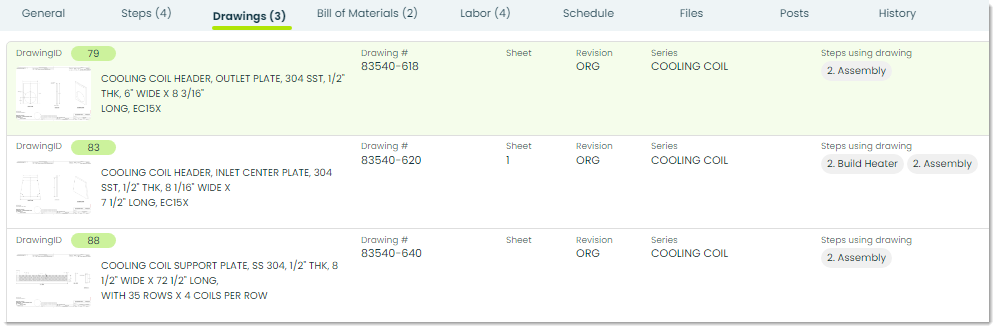
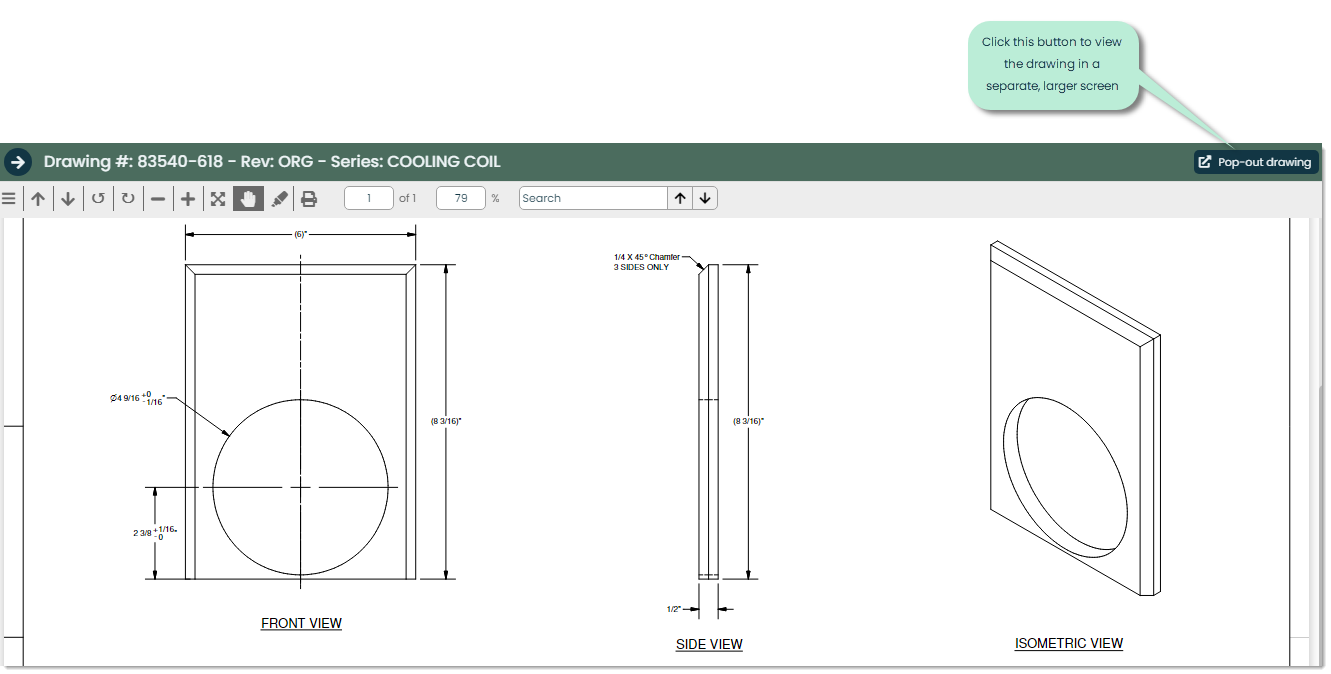
You can click on any drawing from this list to see it in a flyout, as well a pop it out into another screen for a larger view.
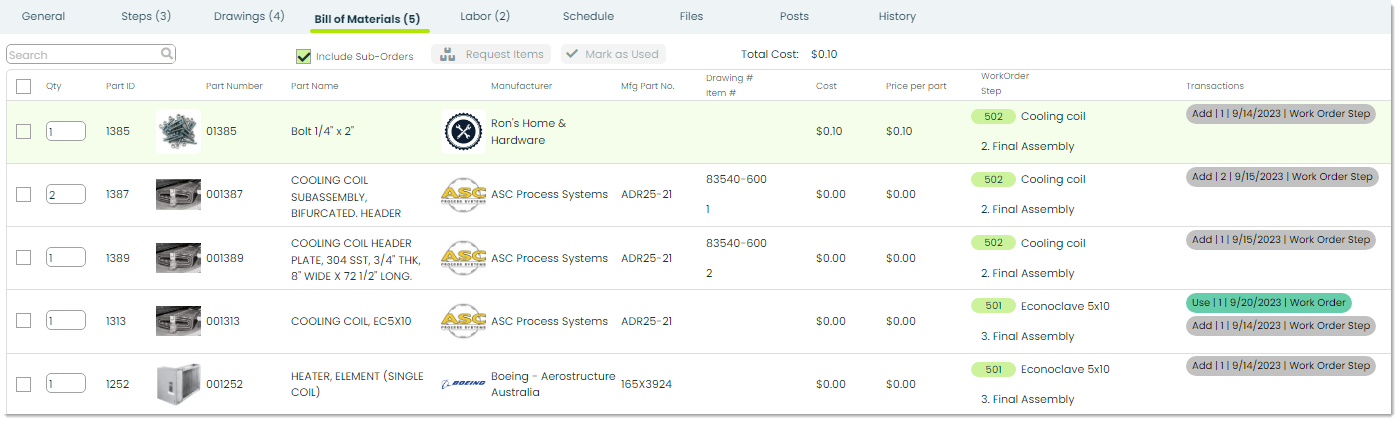
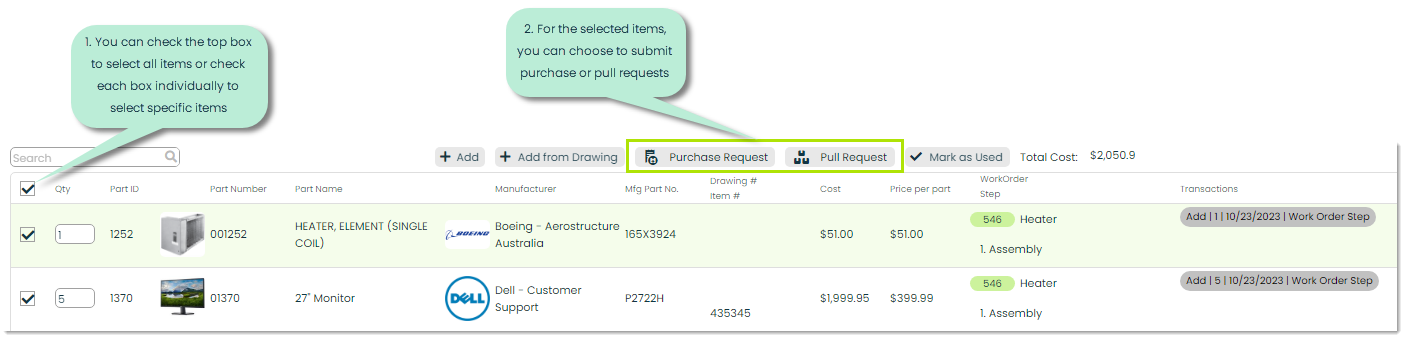
Bill of Materials tab
This tab shows every material you need to finish the work order. It lists each item, how many you need, who makes it, how much it costs, which step it’s for and all the transactions related to it.
Before proceeding, let’s cover what process items, transactions and transaction groups are.
A process item is an item of a given quantity from your Parts app that can be involved in a project, work order, sales order, purchasing/receiving or shipping in some way. It is used to track the life cycle of said quantity of a given part that is ordered, received, put away, requested, pulled, used, packed, shipped and so on.
Transactions are a documented history of activities related to a particular process item. Each transaction tells you what the type of activity or transaction group is, the quantity of the process item involved (can be up to the same quantity as the quantity of the process item depending on the transaction group), when it happened and what object it is linked to (in this case, the transaction is linked to a work order step). It helps you keep track of recent actions on items and keeps everyone informed about what’s been done and what’s next. Items can have multiple transactions, and the list displays the latest ones first. In the example below, there’s just one transaction for adding a material to a work order step.
![]()
Transaction groups define the types of transactions executed. There are different transaction groups for different apps including Purchase Requests, Purchase Orders, Sales Orders, Shipping, Receiving and Inventory, so it’s an important concept to understand. Transaction names and their uses are as follows:
- Add – Used to create the quantity of the process item itself. This is the first transaction of all process items.
- Adjust – Used to modify the quantity of a process item.
- PurchaseRequest – Used when a process item is requested for purchase. Its quantity represents the amount of the process item requested. Attached to a Purchase Request.
- PurchasePending – Used when adding a process item to a Purchase Order. Its amount represents the amount of the process item to be purchased. Attached to a Purchase Order.
- Purchase – Used when a process item is purchased. Will replace the PurchasePending transaction when the purchase is confirmed.
- VendorShip – Used when a purchased process item has been shipped by the vendor.
- Receive – Used when a shipment containing that process item arrives from a vendor.
- PutAwayRequest – Used after a process item has been received and needs to be put into inventory.
- PutAway – Used when a process item is put into inventory.
- PullRequest – Used when a work order/project/sales order/shipment requests to pull a process item out of inventory.
- Pull – Used when a process item is pulled out of inventory.
- Use – Used when a process item is consumed in the building of another project.
- Build – Used when a process item is built.
- ReadyToShip – Used when a process item is ready to ship.
- ShippingPending – Used when a process item is added to a shipment, but has not actually been shipped.
- Pack – Used when a process item is packed into a shipment.
- Ship – Used when a process item is shipped.
Now that we have those concepts covered, let’s take a closer look at the Bill of Materials.
Important note: By default, this list only includes the materials needed for regular steps and doesn’t show the materials for sub-work order steps. For work orders that have sub-work orders as steps, you can choose to include the materials in this list by checking the box next to Include Sub-Orders.
If you need more of an item than you have, you can ask for it by checking the boxes next to the items and clicking Request Items. The system will figure out if it should be purchased or pulled from inventory and handle the request for you.
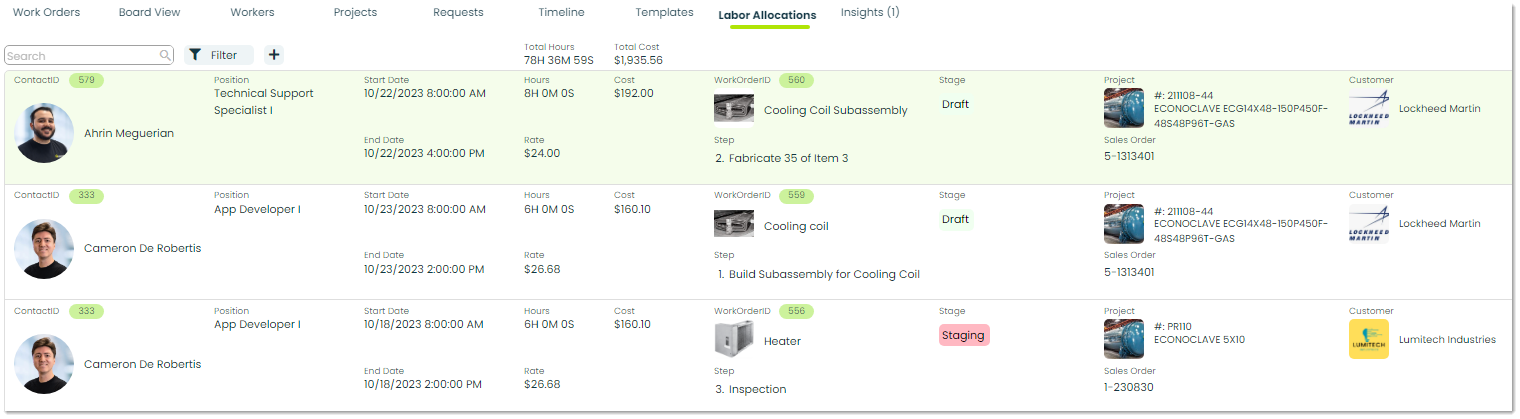
Labor tab
This tab contains a combined list of labor estimates, allocations and assignments from all steps of the work order.
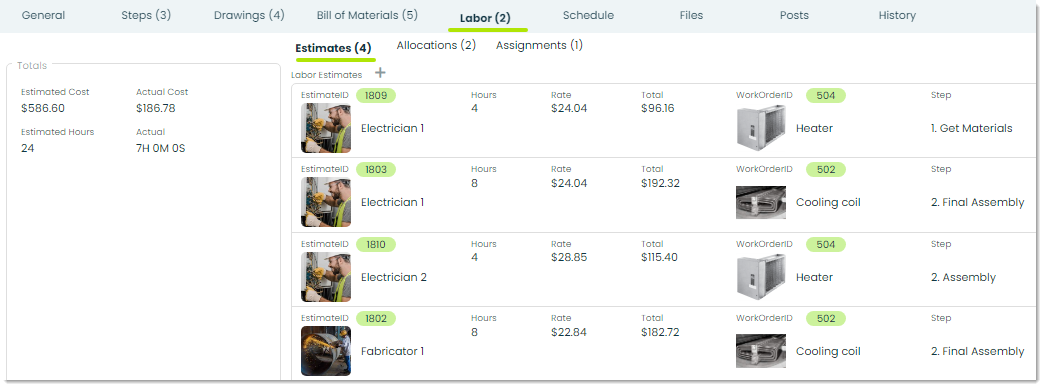
Here are the different sub-tabs of the Labor section:
Estimates – The Estimates tab displays the planned labor time and costs for a work order. It shows the type of labor (like Electrician or Fabricator), how many hours are expected, the hourly rate, the total cost, and which work order and step it’s related to. You can only add estimates at the step level, not at the work order level. For more on adding estimates, refer to the section on How to add a new work order.
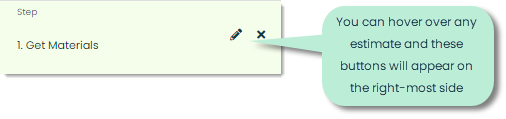
To change or remove an estimate, just hover over it in the list and click the pencil icon to edit it or the x icon to delete it. If you choose to edit, a screen will appear where you can adjust the labor category, hourly rate and the number of hours.

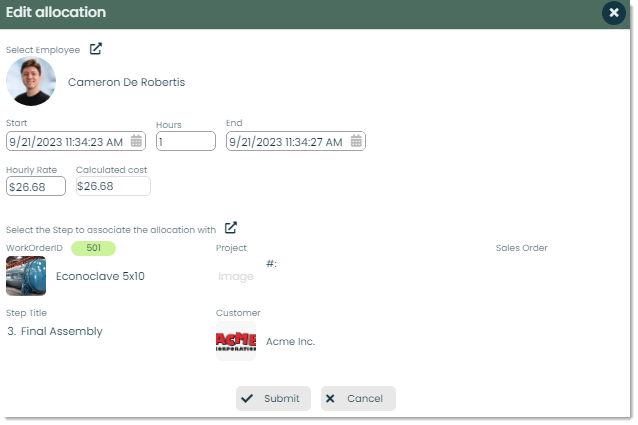
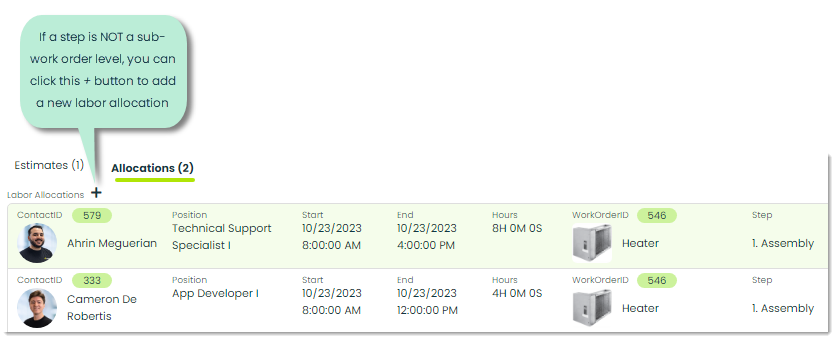
Allocations – Allocations show the real hours of labor and the laborers. You can see who worked, how many hours, for which work order and step and the total cost of their labor.

To add an allocation, click the + button next to Labor Allocations to add in allocation details. Click Submit to add the new allocation to the work order.
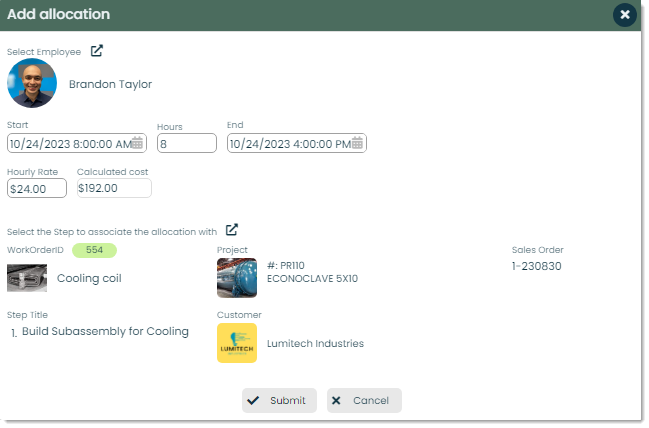
Similar to estimates, you can change or remove allocations. Just hover over any in the list and click the pencil icon to edit it or the x icon to delete it. If you choose to edit, a screen will pop up, allowing you to change the employee, the hours they worked, their hourly rate and/or the step they worked on.
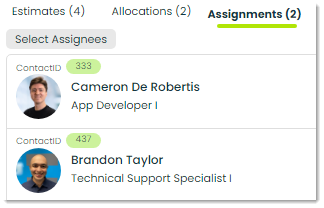
Assignments – This tab lists all of the people who are assigned to the work order. You can click the Select Assignees button to choose who should get assigned.
Schedule tab
This tab shows a visual hierarchy of all the tasks in the work order and their timeline. You can see when each step is scheduled, and you can easily change the schedule if necessary.
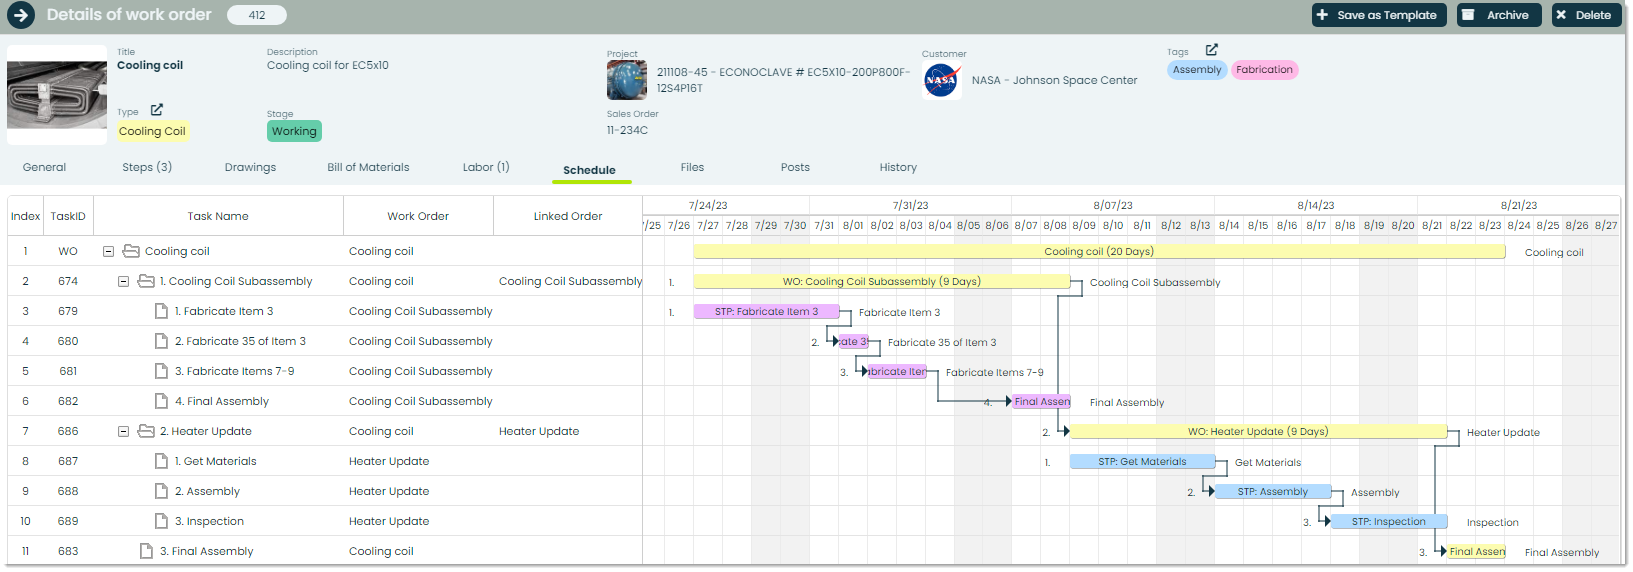
On the left side, there’s a list of the work order and its steps organized in a table. Except for the Index, TaskID, Work Order and Linked Order columns, you can change the values in any cell by clicking on it and inputting new data. Now, let’s understand what the columns in this table mean.
- Index – This is a unique identifier for each row of the Gantt chart.
- TaskID – This is an identification number for each task or step within the work order. If it says WO, it means that task is the main work order.
- Task Name (editable) – This is the name or description of the specific task or step. You can tell the difference between work orders and regular steps because work orders have a folder icon, while regular steps have a paper icon next to them, which helps organize the list. You can click the minus (-) button next to work/sub-work orders to shrink the table and chart, giving you a simpler, bird’s-eye view of the work order.
- Work Order – This is the name of the work order that the task belongs to.
- Linked Order – For steps that are work orders, this field lists the work order that the current work order points to. This is used to connect each work order and implies that the linked work order follows the current work order.
- Duration (editable) – Although not displayed in the picture above, you can click and drag the side of the table to reveal this field and the rest that follow. The duration displays the amount of time for a specific task.
- StartDate (editable) – This is the start date of the task.
- EndDate (editable) – This is the end date of the task.
- Predecessor (editable) – This denotes the task that must be finished before this task can start, denoted by the TaskID, relation and offset value.
On the right side is the actual Gantt chart. Each colored block represents a different task, and the labels are prefixed WO for steps as sub-work orders and STP for regular steps. You can click on any task to open its details.
As discussed in the General tab of the work order, you can specify the color of the steps of a work order with the Gantt color field. Let’s take the picture above as an example. The root work order has a Gantt color of yellow, therefore all steps of that work order appear in the chart as yellow. Each of those sub-work orders have different colors assigned to them (pink for #674 Cooling Coil Assembly, blue for #686 Heater Update). Therefore, the steps of each of those work orders would appear as pink and blue, respectively.
One great feature of this chart is that you can simply drag and drop or resize tasks to change their dates and times. The chart then automatically updates the schedules for you. It makes planning and scheduling much easier and more visual.
How to view and edit the details of a step
From the Steps tab of any work order’s details, you can view the details of an individual step by clicking on it from the list. Depending on if the step is a sub-work order or not, this screen will differ for some fields.

Let’s review this flyout one tab at a time to explore all the things you can see and change for a step.
General tab
Title – This identifies the specific task or action to be performed as part of the work order. It provides a clear and concise label for that particular step to help in understanding what needs to be done.

Status – The status of a work order step represents its current state or condition in the workflow. It indicates whether the step is pending, in progress, completed or has any other relevant status that helps in tracking and managing the progress of the task. The status provides an at-a-glance overview of where the step stands within the overall work order. You can adjust the status of a step by clicking the external link icon and selecting a new value from the list. Additionally, you can modify the actual step statuses by clicking the pencil icon next to any status and making changes as you see fit.


Sub-Work Order – If the step is a work order, this field will show the information of that work order including ID and part for the work order. There is also an option to go directly to the details of the sub-work order by clicking the Go to Work Order button.

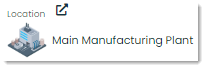
Location – This field identifies the specific place or area where the work needs to be performed, providing clarity on the physical context or site for that particular step. You can click the external link icon to choose a location from the list of places you’ve added to your Locations app. For more on adding locations, please refer to our guide on Getting Started with Locations.
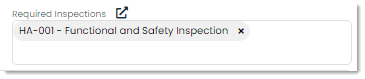
Required Inspections – This field ensures that specific checks, tests or examinations are performed to verify that the task has been completed correctly and meets quality or safety standards. These inspections help confirm that the work done in that step is in compliance with relevant regulations, guidelines or company policies. You can add or edit the list of inspections for a step by clicking the external link icon. This will open a popup for selecting an inspection that you’ve added to your Inspections app. For more on inspections and how to create them, please refer to our guide on Getting Started with Inspections.
Asset Type/Required Asset – With this section, you can indicate any assets used in the process of completing this step as well as its asset type. The choices of assets and asset types come from your created assets in the Assets app. For more on creating assets, please refer to our article on Getting Started with Assets.

Instructions – These are detailed guidelines or directions provided to personnel or individuals responsible for carrying out a specific task as part of the work order. These instructions outline the steps, procedures, safety protocols and any other relevant information necessary to complete the task accurately and efficiently.

Scheduling – Here, you can edit the schedule of a step by modifying the values in the available fields. For a refresher on using the scheduling fields, refer to the Scheduling section of How to add a new work order.
Estimates – The Estimates tab shows the expected labor time and costs for a step. If a step is NOT a sub-work order, you can add new estimates by clicking the + button. This is because estimates are added at the regular step level, not the work order level. For a step as a work order, this tab will display the combined estimates of that sub-work order’s steps. For more on adding estimates, refer to the section on How to add a new work order.

To change or remove an estimate, just hover over it and click the pencil icon to edit or the x icon to delete.
Allocations – The Allocations tab shows the actual labor time and costs for a step. Similar to estimates, if a step is NOT a sub-work order, you can add these allocations by clicking the + button. Allocations apply to each regular step, not the entire work order. For more on adding allocations, please refer to the How to add a new work order section.
To change or remove an estimate, hover over it and click the pencil icon to edit or the x icon to edit.

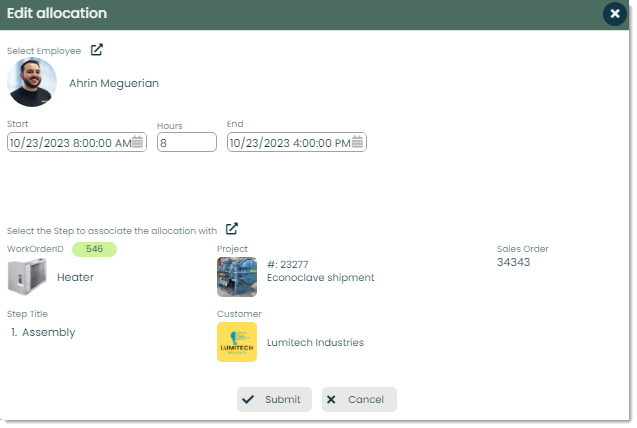
If you click on the pencil icon, you can modify allocation information including the selected employee, start and end dates/times of their work and the associated step.
Bill of Materials tab
The Bill of Materials tab is used to view and/or add the necessary materials for to a step. For regular steps, you’ll see all the necessary materials for that particular step. For steps as work orders, you will see an aggregate of all the materials of the steps of that sub-work order.
Important note: Items can only be added to regular steps.
To add a new item, click either + Add or + Add from Drawing. Let’s go over these two options.
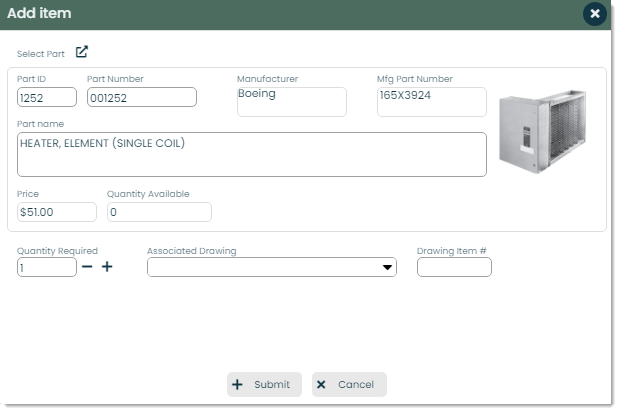
Add – Clicking on this button will open a popup for selecting an item from your Parts app. After choosing a part, you can see the current quantity available of that item and identify how many you’re going to need. If there’s a related drawing, you can select that as well. To add the item to your bill of materials, click Submit.
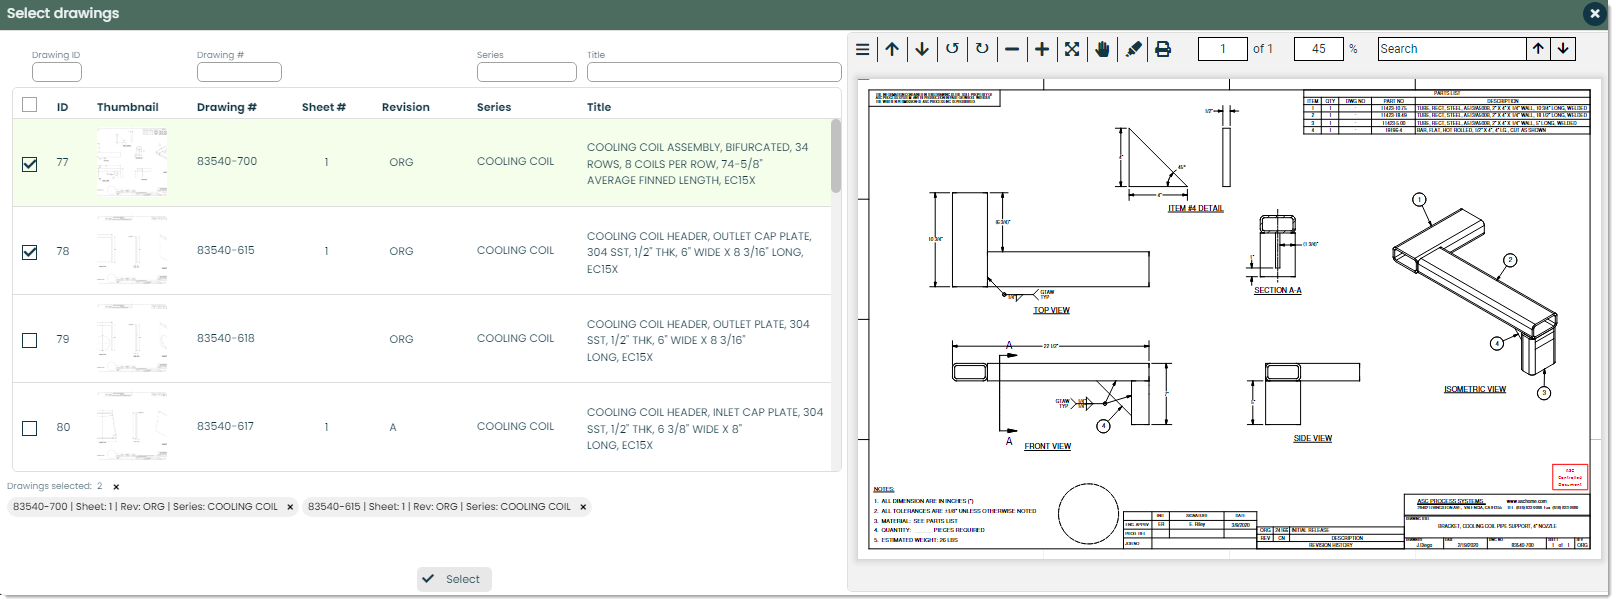
Add from Drawing – Clicking on this button will open a popup for adding items from drawings. Drawings are detailed diagrams or illustrations that provide visual and dimensional information about a product, component or assembly. They often include specifications, measurements and other essential details necessary for understanding how to manufacture, assemble or inspect a particular item. Drawings can be crucial in the manufacturing and assembly processes as they serve as a reference for workers to ensure that they are producing or assembling a product correctly.
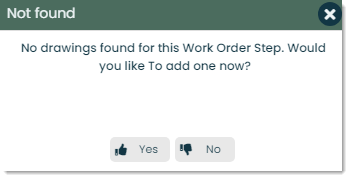
If no drawings have been added to a work order step, you will receive the following message:
Depending on the materials needed, you may need to submit purchase and/or pull requests for these items. Let’s go over what each of these are.
Purchase request – A purchase request is a formal, internal request to make a purchase of a good or service. This request usually goes out to a department responsible for handling purchasing and procurement. If approved, it becomes an official purchase order which authorizes the procurement of the requested items.
Pull request – A pull request is an internal request to pull a specified quantity of parts or materials from inventory. It serves as a formal and organized way to manage and track the movement of inventory items within your business.
To add a purchase or pull request for an item or set of items, check the boxes next to the items you’d like to request. Then, click the Purchase Request or Pull Request buttons depending on what action you want to perform.
Drawings tab
This tab displays any technical drawings needed to complete a step. Drawings could include assembly instructions, wiring diagrams, dimensions of materials or any other important visual aid. To select drawings, click the + Add drawings button.

This will open a popup for selecting as many drawings as you’d like from your Drawings app. After you’ve made your selection, click Select at the bottom to add those drawings to the step. For more on drawings, check out Getting Started with Drawings.
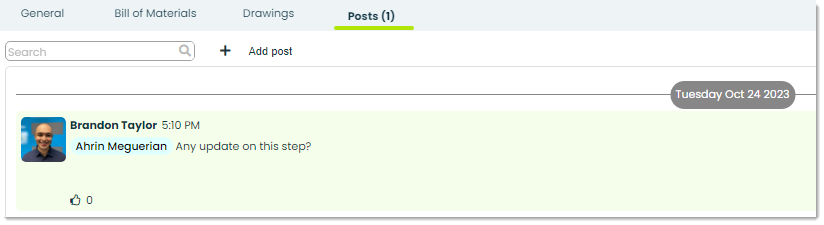
Posts tab
This tab is where you can add comments about a step. You can ask questions to clarify the step, give feedback to a worker or manager, or provide more information about the step. It’s basically a place to leave notes and provide extra details for a step.
How to use the other Frontline Features of Work Order Director
Each app has a set of Frontline Features which are tabs that provide powerful utility based on the app they are found in. In the case of Work Order Director, these features can be found in the details page of any work order. They are:
- Files
- Posts
- History
Files – Any important documents that you’d like to attach to a work order record can be added in the Files tab. With this feature, you can add in as many files as you want and view them with the embedded document viewer.

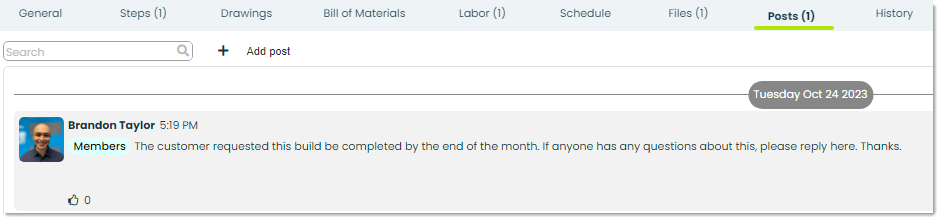
Posts – A post is a comment which can be replied and reacted to by other people in your organization. You can write a post with any questions or comments about a work order as well as mention people or departments by using the @ symbol to notify the respective parties of the post.
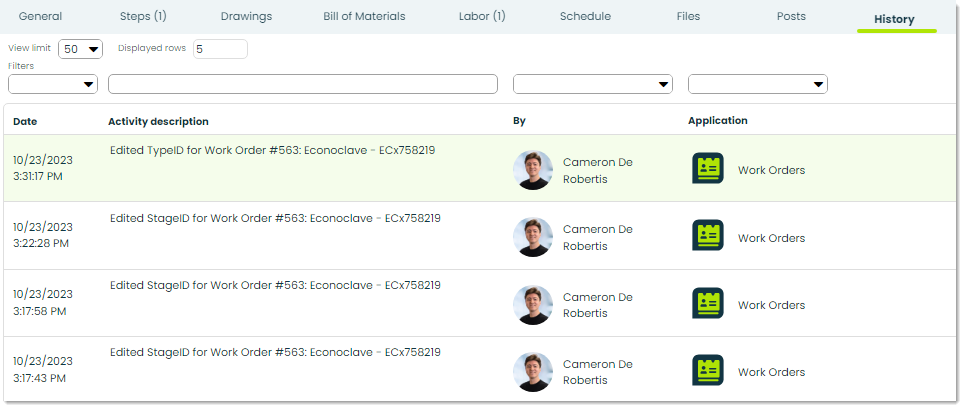
History – The History tab provides a detailed log of recent actions performed on a specific work order record. This is useful for tracking any changes made, who made them and when.
How to archive or delete a work order
This section will cover two features that can be found in the top-right corner of the details page of all work order records. These are archiving and deleting.

Here are how those buttons work:
Archive – Archiving is used to store records in a safe, accessible location other than the main list. It’s good for hiding records that don’t need to be seen.
Delete – To delete a work order entirely, you can use this feature and the record and all of its steps and sub-work orders will be removed.